-
Search Results
-
Hi there,
I’m having serious issues when configuring a second joystick for Snes and using my BUFFALO joysticks
I have, in total, 3 pairs of different joysticks
2 original N64 joysticks connected throught a Mayflash N64 to USB adapter
2 iBuffalo Snes joystick
2 BUFFALO BSGP1601Pi Model: 2 b+
RetroPie Version Used: 3.3 (Fresh installed)
Built From: SD Image
USB Devices connected:
Aside from the aforementioned joysticks, I have a keyboard, a mouse and a WiFi adapter. Everything is connected throught an active USB hubWhen using the Snes/NES emulator, I can configure only snes joystick without any issues. However, when I try to configure the other one, the emulator won’t detect I’m pressing any buttom. I tried changing the joystick but only detects one kind of joystick at a time (I’d have to use a Snes controller for player 1 and a N64 for Player 2)
The funny part is I get the “not configured” yellow message for Snes controllers and the N64 controllers when the Snes emulator starts (it doesn’t matter which one). But for the BUFFALO ones, I get the “Connected in port #4 and #5” and yet, it won’t let me choose them within the settings.
I’ve also tried mapping the snes.cfg manually and I ended up controlling both players (1 and 2) with my player 1 joystick eventhough I set the input_device_p2 and input_player2_joypad_index to the result from the jstest command.
So, long story short
1) How can I configure a second matching joystick?
2) Why I can’t use my BUFFALO controllers and how would I fix it?If you were kind enough to read this, let me thank you for your time.
Thanks
JanusI would really appreciate any assistance, and I’m happy to provide as much information as needed,but please be specific on how I can assist, since I am completely over my head.
I followed the GitHub and Floobs youtube video to enable my Xbox 360 controller, but I haven’t been able to complete the project.
In a nutshell, my controller works to control EmulationStation, but poops the bed as soon as I open any ROM. I understand there is a configuration file for EmuStation versus individual ROMS, but a hefty amount of the information I’ve found seems to be out of date, so I’m not sure where I grab the working configuration info, and exactly where to out it.
The controller is installed, and jstest runs successfully, I’ve made a note of my button configuration (pressed Y and noted that 7=on).
Emulation Station is working with the Controller
When I launch any ROM, I get a notification that Xbox Controller 1234/56767 is not configured.From what I’ve gathered, retroarch-joyconfig is no longer a thing, and that seems to be where I’m stuck.
I can view my /opt/retropie/configs/all/retroarch.cfg file, but the buttons listed there don’t match up with my jstest notes.
Thanks already for any help!
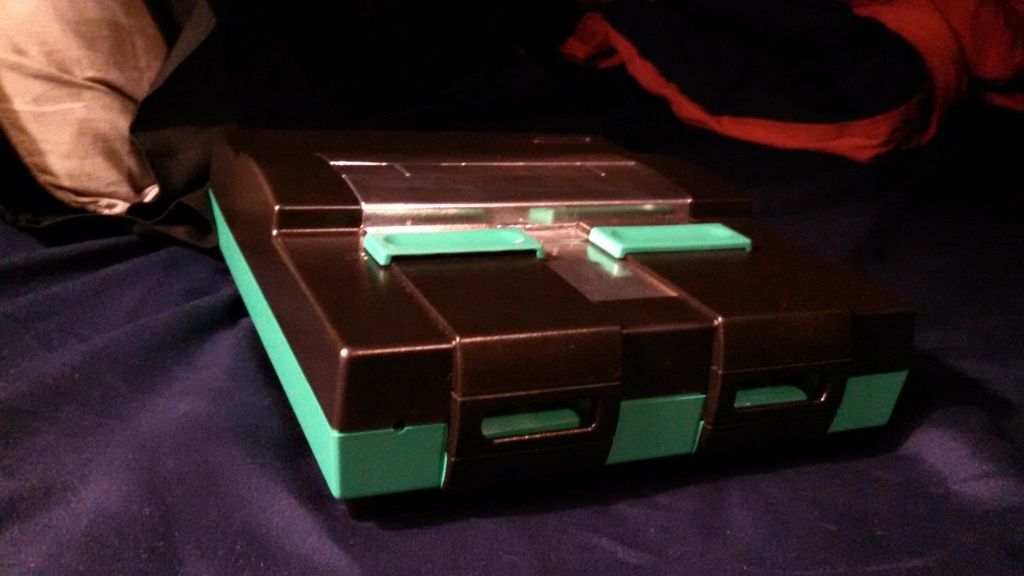
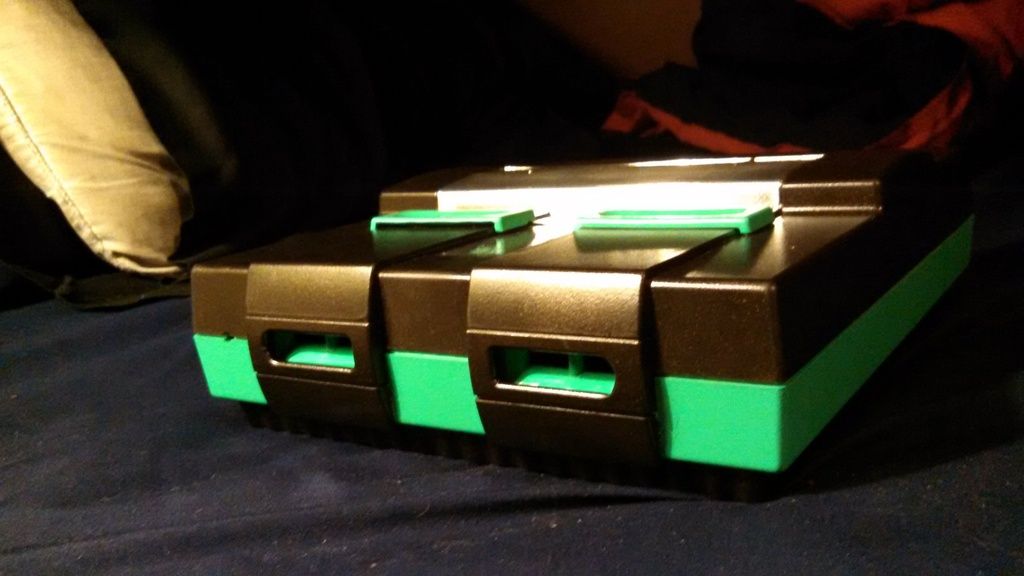
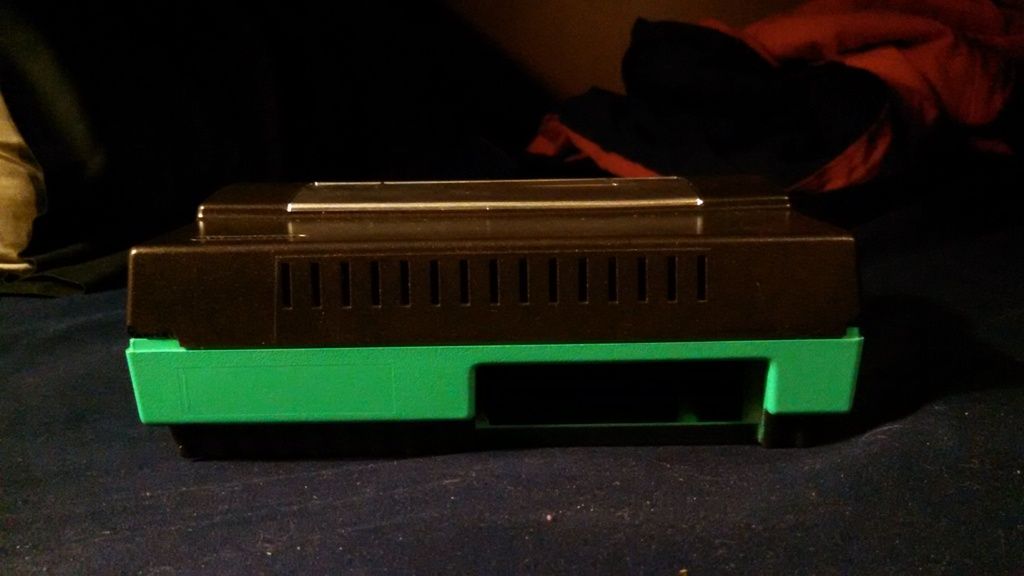
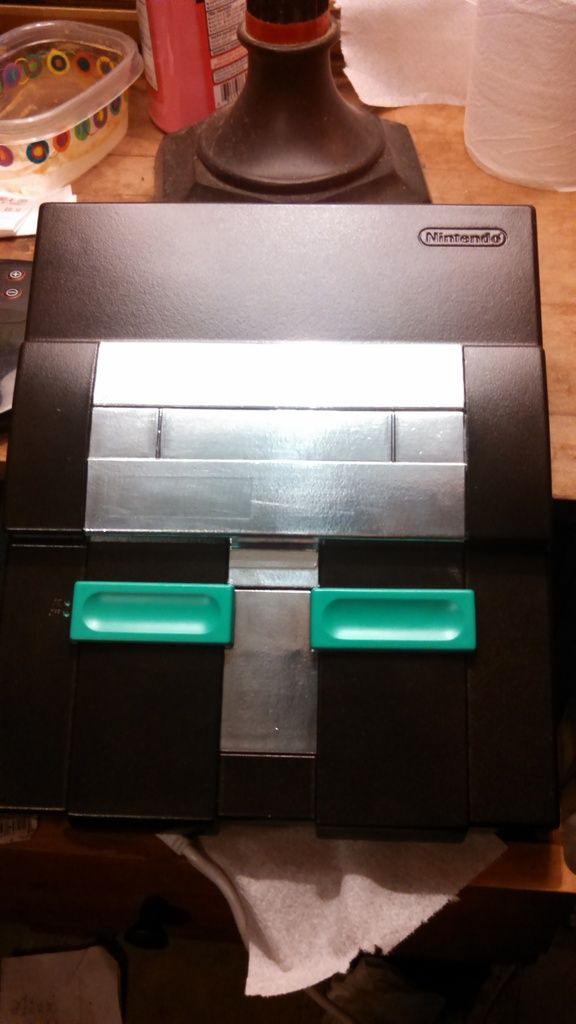
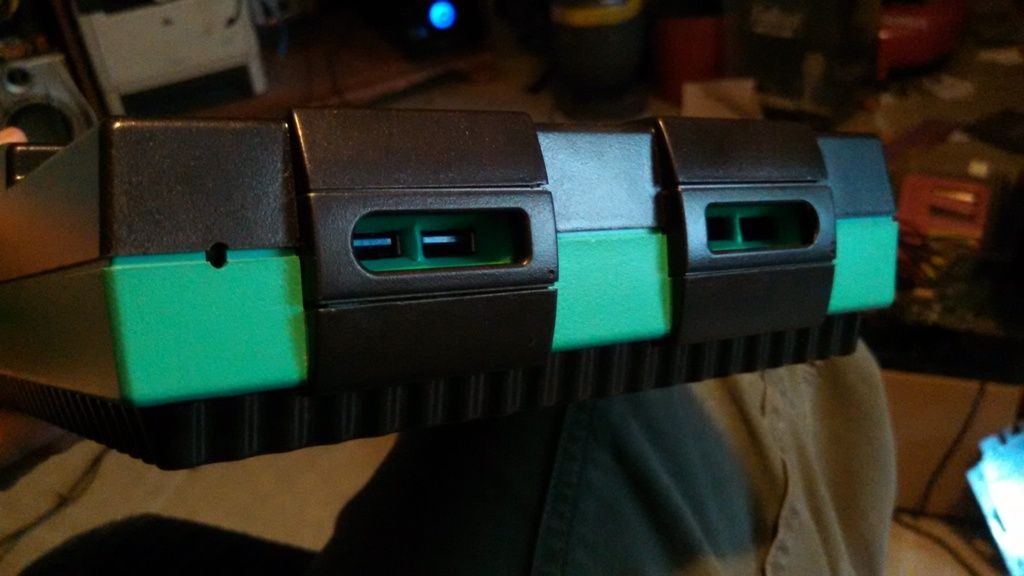
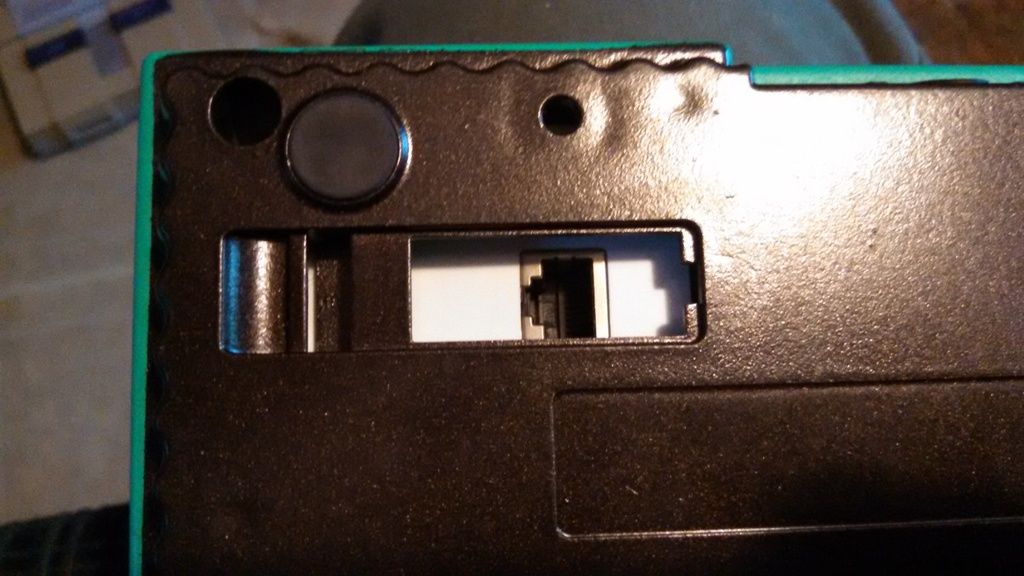
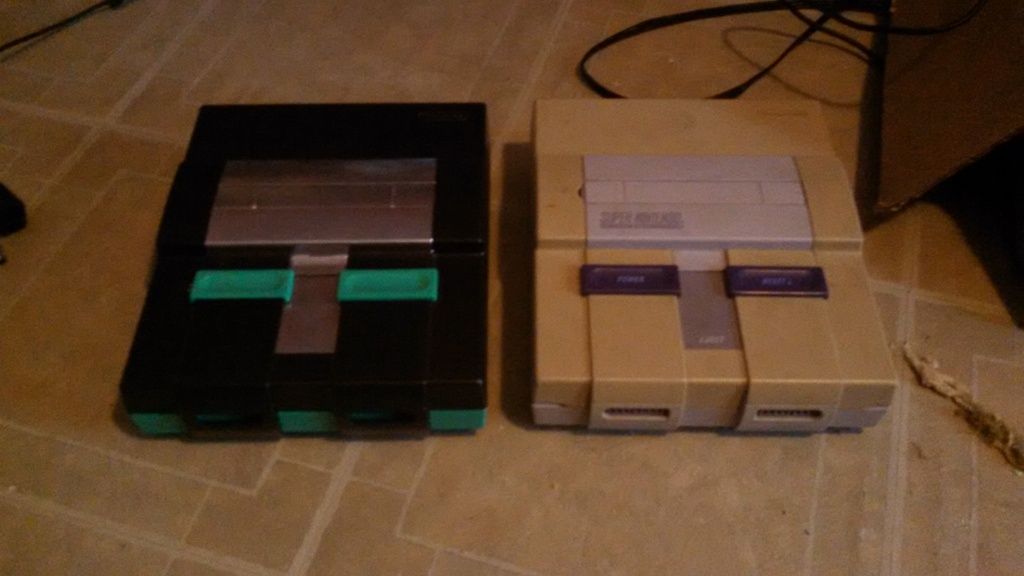
At long last, finally got back to building my case. I have been preoccupied with having a PC at my disposal, so that distracted me a good bit. The colors are Rubbed Bronze, which isn’t quite a black, with bronze metal flakes (Rustoleum collection) with Sea Green (Krylon collection), with some foil tape just because.
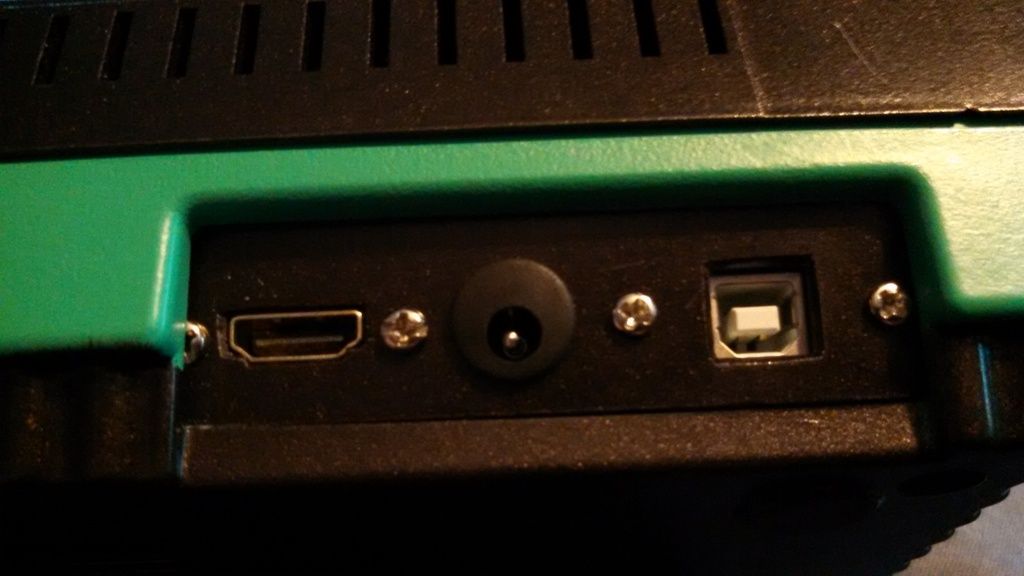
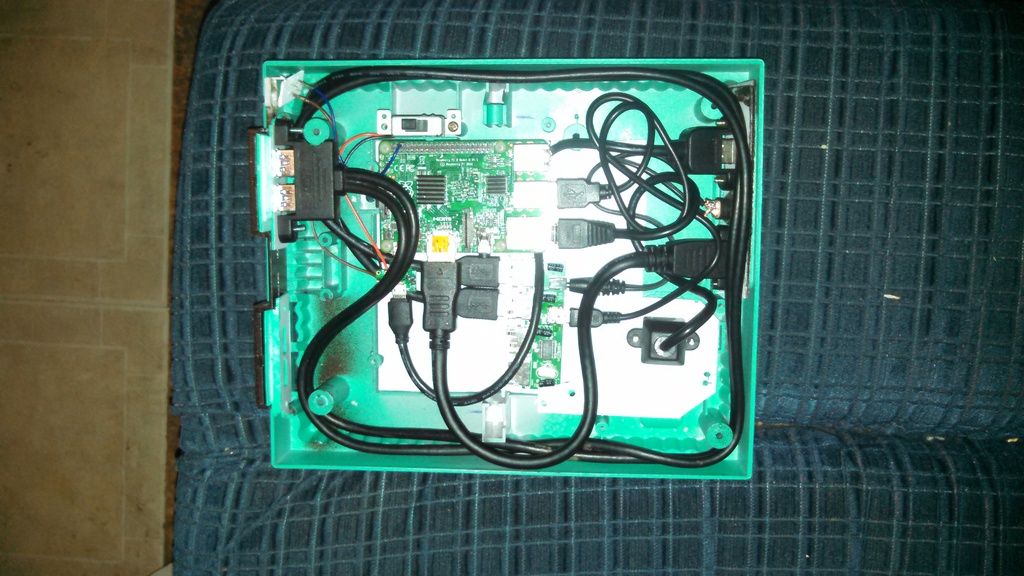
Inside, I have a powered Belkin USB hub (thanks Amazon for having it really cheap), extensions for HDMI, power to the hub, power to the Pi, ethernet which is put where the expansion bay was, and dual USB panel mount extensions (still waiting on the last one to come in). I also have a 5mm RGB LED set up from the Mausberry circuit currently running no resistors for a blinding teal lighting when it is on. I also used a good bit of polystyrene (the kinda stuff they use for model kits) to make my various panels and mounts.
What I started with

The guts (just imagine another dual USB extension in there…)
And next to another SNES
Topic: SNES, PSX/2 Analog Opinions
Essentially my case is almost done, with the exception of a dual USB extension from China and any other odds and ends I decide to add to it, but, I want a more authentic feeling experience when playing these older games, more in particular for the SNES and PSX experience…since N64 is mostly iffy to play. I have looked at both options as far as the SNES goes and have seen plenty of bad reviews that say either some buttons don’t work for USB controls, won’t pick up some buttons for adapters, and the plain just won’t work for anything outside of PC, I have yet to look into analog PSX/2 control options. I know I could easily just stick with my PS3 control for PSX, but having the connector at the other end and not abusing that control would be nicer.
Essentially, I would like to know what USB setups you all have used that have either worked with little to no added pain to get to work properly. I am also using a powered hub in my case to alleviate the strain of 4 ports on the Pi and power consumption.
Hi everyone,
I have some trouble configuring my PS DualShock 3 in Retropie. I managed to correctly pair, connect and configure my controller on my PI 2 (OSMC/Retropie) but as soon as a PSX game is launched, the emulator seams to take the gyroscope information as a joystick input (and one knows that Medievil couldn’t be played that way ;) )
Any way to disable gyro in sixad ?
Thx !Hey folks, I’m not too experienced with Linux or RetroPie.
I had a version of RetroPie up and running and working pretty well. You can see my PiTendo build in an original NES case on the “people’s projects” section. I had gotten the N64 emulator going and playing some Conker’s Bad Fur Day with a PS3 controller and life was good. That was on version 3.0 beta 3. Then I decide to do some updates (apt-get upgrade -y git and then apt-get install -y git dialog) and it hosed me up somehow and then nothing would work. I don’t think I’ll do that again :-)
Well, I was trying to get everything perfect so I could image that set-up and make several others to give to some of my buds for xmas… so I’m bummed. Me and the boys used to play multi-player on Conker’s all the time so I really wanted to get the N64 emulator working before presenting them, if I can.
So, today I’ve been trying to do a completely fresh build up using the 3.2.1 image. I thought it would be better to get a stable version. Things are going pretty well mostly. I’ve got my controllers working and NES/SEGA is running fine. When I try to run N64 now though, I get an error.
Sorry, I’m being long winded.
I’m using a Raspberry Pi 2 B
3.2.1 image
build from binary
using iBuffalo SNES style controller and Playstation 3 dual shock connected VIA wire
A basic generic USB keyboard
Guides and instructions mostly from Google and YouTube (a lot of stuff from floob who I’m not surprised to see is a frequent poster here).
Very little done at this point other than getting the controllers set up and adding some roms.When attempting to run an N64 game I get a few lines of text telling me where errors are logged then it dumps be back to EmulationStation. In the log it tells me:
/opt/retropie/supplementary/runcommand/runcommand.sh: line 704: 2492 Segmentation fault /opt/retropie/emulators/retroarch/bin/retroarch -L /opt/retropie/$I have attempted to solve the problem by using the setup script to re-install the mupen64 and libreto mupen64 emulators VIA binary but that didn’t seem to do much.
Again, I’m a bit of a newb to linux but I’m actually a technical lead by profession so not a total idiot (just mostly LOL). I have started doing this stuff to try to get beyond the basics in Linux.
Here’s what happens if I try to start ANY n64 ROM (all of which worked for me in the beta version I was using earlier).
Press a key (or joypad button 0) to configure launch options for emulator/port (lr-mupen64plus). errors will be logged to [blah]
plugin_start_gfx_success
GfxRomOpen.
Init new dynarec
===========================================================Then it dumps me back to EmulationStation.
Thanks for any help!
Hello
I’ve run Retropie from V2 through V3 now. I’m running into an issue with a Logitech Dual Action gamepad when mapping controls via the RGUI menu in each emulator.
My controller seems to auto-map correctly, but the NES emulator and SNES emulator map buttons to the wrong location on the gamepad. This seems to be by default. So I’ve been trying to manually map buttons for each emulator, saving a config file specific to each emulator once the buttons are accurately mapped.
The main issue I’m running into is when binding buttons for my gamepad and saving the configuration, after exiting the emulator and re-opening the emulator, the saved config file with specifically assigned buttons and a RGUI menu toggle button (choosing L3 + R3 via the menu) does not work. It works fine while I’m still in the emulator after configuring everything (without exiting the emulator), but after exiting the emulator it loads the retroarch.cfg general settings rather than the emulator specific config files I set and saved the last time the emulator was open. The problem is I can’t get to the RGUI input menu via a hotkey (L3+R3), I have to use a keyboard.
I want to save it in a way that automatically loads the config each time the emulator runs. Otherwise I’ll have to use a keyboard to get to the menu to reconfigure the button mappings each time the emulator is loaded.
Any advice? Thank you
Hello there!
I have an annoying issue. While playing games, my controller, a Logitech Dual Action, which hasn’t made any troubles to me before, disconnects during gameplay. A yellow text appears on the screen (don’t know what it says exactly), and I can’t do anything with my controller.
Is this a software issue or a hardware issue?
Thanks in advance!
Topic: Changing the exit button
Hi all. I’ve bought a second pi2 to make a portable console as my main one is in my arcade machine. To save time and effort I’m using a copy of the arcade sd in the new one.
My issue is that button 8 on my arcade stick is exit but that’s l2 on my dual shock. This makes it easy to accidentally press and rules out pax games. I’ve gone into the .cfg and deleted the line for exit unfortunately this hasn’t worked. I’ve looked in both the retroarch and pad specific .cfg and I can’t see what I’m missing.
Is there anything else I need to look for or failing that is there a way of resetting my .cfg files?
I’m assuming the setting is somewhere in a global file as I assume l2 isn’t exit by default.
Thanks all.
EDIT: I’m on mobile at the moment. When I get home later I’ll try to get my cfg files uploaded.
Hello, I connected my Dualshock 4 via Bluetooth. Some emulators (for example uae4all) works with analog directions only. Its very sensitive.
Topic: Scraper issue (no data)
1st THANK YOU…every problem I have had (we ) have solved, whether hot keys to exit emulations, getting VICE and Amiga working, wireless PSX dual shock pairing or re imaging you lot have been proper helpful..
I have 1 (last?) question still, having re-imaged/set up on a larger SD card I find all my Scraper data gone – no issue I will re scrape…yet on every game it finds nothing (previously I had to change the ROM name to get rid of the mess ie *.bin etc) but it finds nothing.
I installed SSleph no problem and the Mame look OK (thumbs of the game ) rather than the Arcade machine/Logo I previously had but wonder why the original Scrape no longer yields any results.
If anyone can help I am again grateful.
RetroPie Img: 3+
Rasp Pi: 2 BCheers
Given the fact front ends are designed to be aesthetically pleasing and simplify access to multiple emulated games and systems, it would be nice to have the option to hide parent/children roms in Emulation Station menus. In situations whereby multiple roms are required (parents, children, BIOS roms, etc), all of the roms are currently listed individually in the EmulationStation menu. This is confusing to “casual” users who aren’t familiar with manipulating rom sets, configuring emulators, etc. I would imagine many of us are trying to set up “clean” systems that can be used by novices. Simple is better.
There are workarounds, but if EmulationStation provided an option to hide files, life would be much simpler. I assume it wouldn’t be too difficult to add this option.
Of course, there are times when its completely legitimate to display all the parent/children files (for example, situations whereby multiple children roms allow a game to be played in various foreign languages) – so this would need to remain configurable by the user – versus an “automatic” function.
Keeping my fingers crossed.
Jim
I was having trouble launching SMS roms with default ES SMS emulator.
changed default to osmose.
roms now launch, but i get no controller functionality (PS3 Dual Shock via bluetooth)
Looking at es_systems.cfg and from my reading:
https://www.raspberrypi.org/forums/viewtopic.php?f=78&t=23550
https://github.com/RetroPie/RetroPie-Setup/wiki/Master-Systemit seems that this portion:
<system>
<name>mastersystem</name>
<fullname>Sega Master System</fullname>
<path>/home/pi/RetroPie/roms/mastersystem</path>
<extension>.sms .bin .zip .SMS .BIN .ZIP</extension>
<command>/opt/retropie/supplementary/runcommand/runcommand.sh 0 _SYS_ mastersystem %ROM%</command>
<platform>mastersystem</platform>
<theme>mastersystem</theme>
</system>seems incorrect. I took a look at runcommand.sh but it was massively confusing.
Do i have to manually update <command> to run SMS roms using osmose?
I looked at /opt/retropie/configs/all/emulators.cfg. i can see where i have modified some n64 stuff. Should there be an entry here for mastersystem?
Beginning to run out of ideas here. Please help! Thanks in advance!
I am slowly, but surely getting everything working in my RetroPie.
Right now, my current hurdle to get over is getting my master system up and running.
Genesis, SNES, NES, N64, and Atari all seem to be working using my PS3 Dual Shock Controller, over USB and also with bluetooth.
Even playing some SMS ROMS through the Megadrive Emulator seems to work fine.
I am running RetroPie 3.2.1 (fully updated, updated emulator binaries, setup script, etc.) on a RPi2.
Hopefully these snippets will help provide some insight as to what my issue is. i am sure it is something easy. Please help!
#### Input
# Input driver. Depending on video driver, it might force a different input driver.
# input_driver = sdl# Input device driver. (Valid: linuxraw, sdl, dinput)
# input_joypad_driver =# Path to input remapping file.
# input_remapping_path =# If enabled, overrides the input binds with the remapped binds set for the current core.
# input_remap_binds_enable = true# Maximum amount of users supported by RetroArch.
# input_max_users = 16# Keyboard layout for input driver if applicable (udev/evdev for now).
# Syntax is either just layout (e.g. “no”), or a layout and variant separated with colon (“no:nodeadkeys”).
# input_keyboard_layout =# Defines axis threshold. Possible values are [0.0, 1.0]
# input_axis_threshold = 0.5# Enable input auto-detection. Will attempt to autoconfigure
# joypads, Plug-and-Play style.
input_autodetect_enable = true# Show the input descriptors set by the core instead of the
# default ones.
# input_descriptor_label_show = true# Hide input descriptors that were not set by the core.
# input_descriptor_hide_unbound = false# Directory for joypad autoconfigs.
# If a joypad is plugged in, that joypad will be autoconfigured if a config file
# corresponding to that joypad is present in joypad_autoconfig_dir.
# Input binds which are made explicit (input_playerN_*_btn/axis) will take priority over autoconfigs.
# Autoconfigs can be created with retroarch-joyconfig, manually, or with a frontend.
# Requires input_autodetect_enable to be enabled.
joypad_autoconfig_dir = /opt/retropie/configs/all/retroarch-joypads/# Sets which libretro device is used for a user.
# Devices are indentified with a number.
# This is normally saved by the menu.
# Device IDs are found in libretro.h.
# These settings are overridden by explicit command-line arguments which refer to input devices.
# None: 0
# Joypad (RetroPad): 1
# Mouse: 2
# Keyboard: 3
# Generic Lightgun: 4
# Joypad w/ Analog (RetroPad + Analog sticks): 5
# Multitap (SNES specific): 257
# Super Scope (SNES specific): 260
# Justifier (SNES specific): 516
# Justifiers (SNES specific): 772# input_libretro_device_p1 =
# input_libretro_device_p2 =
# input_libretro_device_p3 =
# input_libretro_device_p4 =
# input_libretro_device_p5 =
# input_libretro_device_p6 =
# input_libretro_device_p7 =
# input_libretro_device_p8 =# Keyboard input. Will recognize letters (“a” to “z”) and the following special keys (where “kp_”
# is for keypad keys):
#
# left, right, up, down, enter, kp_enter, tab, insert, del, end, home,
# rshift, shift, ctrl, alt, space, escape, add, subtract, kp_plus, kp_minus,
# f1, f2, f3, f4, f5, f6, f7, f8, f9, f10, f11, f12,
# num0, num1, num2, num3, num4, num5, num6, num7, num8, num9, pageup, pagedown,
# keypad0, keypad1, keypad2, keypad3, keypad4, keypad5, keypad6, keypad7, keypad8, keypad9,
# period, capslock, numlock, backspace, multiply, divide, print_screen, scroll_lock,
# tilde, backquote, pause, quote, comma, minus, slash, semicolon, equals, leftbracket,
# backslash, rightbracket, kp_period, kp_equals, rctrl, ralt
#
# Keyboard input, Joypad and Joyaxis will all obey the “nul” bind, which disables the bind completely,
# rather than relying on a default.
input_player1_a = x
input_player1_b = z
input_player1_y = a
input_player1_x = s
input_player1_start = enter
input_player1_select = rshift
input_player1_l = q
input_player1_r = w
input_player1_left = left
input_player1_right = right
input_player1_up = up
input_player1_down = down
# input_player1_l2 =
# input_player1_r2 =
# input_player1_l3 =
# input_player1_r3 =# Two analog sticks (DualShock-esque).
# Bound as usual, however, if a real analog axis is bound,
# it can be read as a true analog.
# Positive X axis is right, Positive Y axis is down.
# input_player1_l_x_plus =
# input_player1_l_x_minus =
# input_player1_l_y_plus =
# input_player1_l_y_minus =
# input_player1_r_x_plus =
# input_player1_r_x_minus =
# input_player1_r_y_plus =
# input_player1_r_y_minus =# If desired, it is possible to override which joypads are being used for user 1 through 8.
# First joypad available is 0.
# input_player1_joypad_index = 0
# input_player2_joypad_index = 1
# input_player3_joypad_index = 2
# input_player4_joypad_index = 3
# input_player5_joypad_index = 4
# input_player6_joypad_index = 5
# input_player7_joypad_index = 6
# input_player8_joypad_index = 7# Input device buttons.
# Figure these out by using RetroArch-Phoenix or retroarch-joyconfig.
# You can use joypad hats with hnxx, where n is the hat, and xx is a string representing direction.
# E.g. “h0up”
# input_player1_a_btn =
# input_player1_b_btn =
# input_player1_y_btn =
# input_player1_x_btn =
# input_player1_start_btn =
# input_player1_select_btn =
# input_player1_l_btn =
# input_player1_r_btn =
# input_player1_left_btn =
# input_player1_right_btn =
# input_player1_up_btn =
# input_player1_down_btn =
# input_player1_l2_btn =
# input_player1_r2_btn =
# input_player1_l3_btn =
# input_player1_r3_btn =# Menu buttons.
# menu_ok_btn =
# menu_cancel_btn =
# menu_search_btn =
# menu_info_btn =
# menu_default_btn =
# menu_scroll_down_btn =
# menu_scroll_up_btn =# Axis for RetroArch D-Pad.
# Needs to be either ‘+’ or ‘-‘ in the first character signaling either positive or negative direction of the axis, then the axis number.
# Do note that every other input option has the corresponding _btn and _axis binds as well; they are omitted here for clarity.
# input_player1_left_axis =
# input_player1_right_axis =
# input_player1_up_axis =
# input_player1_down_axis =# Holding the turbo while pressing another button will let the button enter a turbo mode
# where the button state is modulated with a periodic signal.
# The modulation stops when the button itself (not turbo button) is released.
# input_player1_turbo =# Describes the period and how long of that period a turbo-enabled button should behave.
# Numbers are described in frames.
# input_turbo_period = 6
# input_turbo_duty_cycle = 3# This goes all the way to user 8 (*_player2_*, *_player3_*, etc), but omitted for clarity.
# All input binds have corresponding binds for keyboard (none), joykeys (_btn) and joyaxes (_axis) as well.# Toggles fullscreen.
# input_toggle_fullscreen = f# Saves state.
# input_save_state = f2
# Loads state.
# input_load_state = f4# State slots. With slot set to 0, save state name is *.state (or whatever defined on commandline).
# When slot is != 0, path will be $path%d, where %d is slot number.
# input_state_slot_increase = f7
# input_state_slot_decrease = f6# Toggles between fast-forwarding and normal speed.
# input_toggle_fast_forward = space# Hold for fast-forward. Releasing button disables fast-forward.
# input_hold_fast_forward = l# Key to exit RetroArch cleanly.
# Killing it in any hard way (SIGKILL, etc) will terminate RetroArch without saving RAM, etc.
# On Unix-likes, SIGINT/SIGTERM allows a clean deinitialization.
input_exit_emulator = escape# Applies next and previous shader in directory.
input_shader_next = m
input_shader_prev = n# Hold button down to rewind. Rewinding must be enabled.
input_rewind = r# Toggle between recording and not.
# input_movie_record_toggle = o# Toggle between paused and non-paused state
# input_pause_toggle = p# Frame advance when content is paused
# input_frame_advance = k# Reset the content.
# input_reset = h# Cheats.
# input_cheat_index_plus = y
# input_cheat_index_minus = t
# input_cheat_toggle = u# Mute/unmute audio
# input_audio_mute = f9# Take screenshot
# input_screenshot = f8# Netplay flip users.
# input_netplay_flip_players = i# Hold for slowmotion.
# input_slowmotion = e# Enable other hotkeys.
# If this hotkey is bound to either keyboard, joybutton or joyaxis,
# all other hotkeys will be disabled unless this hotkey is also held at the same time.
# This is useful for RETRO_KEYBOARD centric implementations
# which query a large area of the keyboard, where it is not desirable
# that hotkeys get in the way.# Alternatively, all hotkeys for keyboard could be disabled by the user.
# input_enable_hotkey_btn =# Increases audio volume.
# input_volume_up = kp_plus
# Decreases audio volume.
# input_volume_down = kp_minus# Toggles to next overlay. Wraps around.
# input_overlay_next =# Toggles eject for disks. Used for multiple-disk content.
# input_disk_eject_toggle =# Cycles through disk images. Use after ejecting.
# Complete by toggling eject again.
# input_disk_next =# Toggles menu.
# input_menu_toggle = f1# RetroPad button combination to toggle menu
# 0 = none, 1 = L + R + Y + D-Pad Down, 2 = L3 + R3
# input_menu_toggle_gamepad_combo = 0# Toggles mouse grab. When mouse is grabbed, RetroArch hides the mouse,
# and keeps the mouse pointer inside the window to allow relative mouse input
# to work better.
# input_grab_mouse_toggle = f11And my two PS3 configs-
input_device = “PLAYSTATION(R)3 Controller”
input_driver = “udev”
input_b_btn = “14”
input_y_btn = “12”
input_select_btn = “0”
input_start_btn = “3”
input_up_btn = “4”
input_down_btn = “6”
input_left_btn = “7”
input_right_btn = “5”
input_a_btn = “13”
input_x_btn = “15”
input_l_btn = “10”
input_r_btn = “11”
input_l2_btn = “8”
input_r2_btn = “9”
input_l3_btn = “1”
input_r3_btn = “2”
input_l_x_plus_axis = “+0”
input_l_x_minus_axis = “-0”
input_l_y_plus_axis = “+1”
input_l_y_minus_axis = “-1”
input_r_x_plus_axis = “+2”
input_r_x_minus_axis = “-2”
input_r_y_plus_axis = “+3”
input_r_y_minus_axis = “-3”
input_enable_hotkey_btn = “0”
input_exit_emulator_btn = “3”
input_menu_toggle_btn = “15”
input_load_state_btn = “10”
input_save_state_btn = “11”
input_reset_btn = “14”
input_state_slot_increase_btn = “5”
input_state_slot_decrease_btn = “7”input_device = “Sony PLAYSTATION(R)3 Controller”
input_driver = “udev”
input_r_y_plus_axis = “+3”
input_l3_btn = “1”
input_r_x_minus_axis = “-2”
input_r_btn = “9”
input_save_state_btn = “9”
input_l2_btn = “10”
input_start_btn = “3”
input_exit_emulator_btn = “3”
input_l_y_minus_axis = “-1”
input_l_btn = “8”
input_load_state_btn = “8”
input_up_btn = “4”
input_r_y_minus_axis = “-3”
input_a_btn = “14”
input_b_btn = “13”
input_reset_btn = “13”
input_down_btn = “6”
input_r2_btn = “11”
input_l_x_plus_axis = “+0”
input_l_y_plus_axis = “+1”
input_r3_btn = “2”
input_right_btn = “5”
input_state_slot_increase_btn = “5”
input_x_btn = “15”
input_menu_toggle_btn = “15”
input_select_btn = “0”
input_enable_hotkey_btn = “0”
input_l_x_minus_axis = “-0”
input_y_btn = “12”
input_left_btn = “7”
input_state_slot_decrease_btn = “7”
input_r_x_plus_axis = “+2”Thanks in advance for the help.
Hi there, I’ve built my lad an arcade machine for Christmas. Its a Pi 2 Model B with MAME and unfortunately a Xin-Mo USB Interface. I’ve managed to do a few of the tutorials to make the USB device recognise as 2 joypads and get the controls some what sorted out.
Basically I’ve used the start button to bring up the menu where you hold a button to configure your controls and it works to some extent.
When outside of a game P1 joystick Left/Right & Up/Down are inverted. But P2 is fine.
When inside a game P1 is inverted like above but P2 is fine.Could someone please explain the reason? Forgive me I’m new to Pi’s and Linux and so don’t know very much terminology or commands etc. So if you could, could you dumb any answers down for me? lol
I’ve heard of various configuration files that can be edited but I don’t know the difference. The EmulationStation/es_inputs.cfg, the retroarch/config.cfg and I’ve also had a message pop up saying opt/retropie/configs/all/retroarch-joypads/Xin-MoXin-MoDualArcade.cfg…… which ones am I supposed to be editing for “Out Game” and “In Game”?. Once again sorry for my lack of knowledge lol. It’s very painful writing this haha
Any help would be amazing as I’m desperate to get it working soon so I can reassemble it ready for xmas.
Thank You In Advance, This forum has already been a godsend!
P.S Please See attached image for my setup. I have now got LED Strips in the top Part, with a glass panel with my sons name written on it in SEGA text. It’s certainly getting there I Just need this final niggle sorted lol

