-
Search Results
-
Hello folks, just sharing a Eureka moment I had this week.
Spent a whole week trying to run my PS3 controllers via USB into the Pi for RetroPie, but could never get them to work properly. They would be detected, work in jstest, even registered with the input config tool in ES (With errors, more on that later) but would never work properly within the ROMs themselves. This was also after following every guide I could I find on connecting PS3 controllers, which all concentrated on Bluetooth, not USB.
After days of desperation, purchasing a powered USB hub (as I assumed it was a power issue) and manually editing many .cfg files, I found the culprit. It was my Wireless Keyboard, the Logitech K400.
As soon as I unplugged the receiver to the hub, suddenly, success! They worked brilliantly.
My only logical conclusion, is that the Pi could detect the controllers, but presumed that it’s commands would be coming in via the only wireless device it could find, being the keyboard, rather than being hard-wired.
I now run two PS3 controllers with a wired keyboard, and have had nothing but joy.
Just a heads up in case anyone else is having trouble. Good luck. :)
I haven’t had any luck getting this USB pad recognized by RetroPie, I am at the prompt screen and it does not recognize any input from my NeoGeo Pad USB.
When I tried
retroarch-joyconfig, which seemed to be the common response to a similar problem, it still does not recognize button presses. I have also triedjscal /dev/input/js0andjstest /dev/input/js0both show the device but I am not entirely sure what they did.jstestshowed a number of buttons and such, but the buttons said they were off, it would also sit and do nothing until I ctrl+c.Any help or tips is appreciated.
I have this adapter http://www.amazon.com/SNES-Controller-Adapter-USB-Super-NES/dp/B002IXZ5DE which works with both my real SNES controllers flawlessly on every other emulator but RetroPie. As soon as I insert a second controller using RetroPie, it freaks out. One controller misbehaves (doesn’t matter which one) until I remove it and reinsert it and then the buttons sometimes lag.
This thing works, I know that. It supposedly has issues with the type of SNES controller used, but I have both a SNES-005 and a SNES-102 and they work great with it everywhere but RetroPie.
They show up as “HuiJia USB GamePad” and “HuiJia USB GamePad #2” even if there’s nothing plugged into the second one.
My retroarch.cfg file is correct I’m sure. I did the config for player one with both controllers plugged in and then copied everything and changed every instance of “player1” to “player2” and changed “input_player1_joypad_index = “0″” to “input_player2_joypad_index = “1″” so I don’t know what’s up.
Even though the SNES controllers are different models, they are identical and authentic.
I just resolved some very frustrating issues that I was having with my retroarch.cfg joystick config file. Default behavior was strange in some of the emulators, and I couldn’t quite get input_enable_hotkey_btn and input_exit_emulator_btn to work correctly. NeoGeo emulation using FBA did work for some crazy reason, but the other emulators did not. When I removed the input_enable_hotkey_btn line from the config, it would exit whenever I pressed button 0 instead of the button that I tried to configure to the cfg file. I ended up restarting from scratch, and seeing the difference between my old config files and the new config files to find out the difference.
My first error was piping instead of appending when I used the retroarch-joyconfig program found in RetroPie/emulators/RetroArch/tools.
What I typed was:
./retroarch-joyconfig | ~/RetroPie/configs/all/retroarch.cfgI should have typed:
./retroarch-joyconfig >> ~/RetroPie/configs/all/retroarch.cfgI then compounded my problem by manually copying and pasting the following lines into my config file (using vim over ssh, if I remember correctly):
input_enable_hotkey_btn = "8"
input_exit_emulator_btn = “9″
I had not realized two things:
My config doesn’t need the quotes.
I had accidentally pasted two different types of quotes (“ and ″) into a config file, which likely caused the program to freak out and not read the configuration properly.After loading RetroPie 1.9.1 onto the card from scratch, I noticed the error of my ways, updated the configuration file correctly, and I am now able to exit emulators effectively and continue to play games.
Learn from my lesson, RetroPie users! Beware the quotes!
Quoted below is my working config file for a Logitech Dual Action USB controller:
## Skeleton config file for RetroArch # Save all save files (*.srm) to this directory. This includes related files like .bsv, .rtc, .psrm, etc ... # This will be overridden by explicit command line options. # savefile_directory = # Save all save states (*.state) to this directory. # This will be overridden by explicit command line options. # savestate_directory = # Automatically saves a savestate at the end of RetroArch's lifetime. # The path is $SRAM_PATH.auto. # RetroArch will automatically load any savestate with this path on startup if savestate_auto_load is set. # savestate_auto_save = false # savestate_auto_load = true # Load libretro from a dynamic location for dynamically built RetroArch. # This option is mandatory. # If a directory, RetroArch will look through the directory until it finds an implementation # that appears to support the extension of the ROM loaded. # This could fail if ROM extensions overlap. # libretro_path = "/path/to/libretro.so" # Path to core options config file. # This config file is used to expose core-specific options. # It will be written to by RetroArch. # A default path will be assigned if not set. # core_options_path = # Path to ROM load history file. # RetroArch keeps track of all ROMs loaded in RGUI and from CLI directly for convenient quick loading. # A default path will be assigned if not set. # game_history_path = # Number of entries that will be kept in ROM history file. # game_history_size = 100 # Sets the "system" directory. # Implementations can query for this directory to load BIOSes, system-specific configs, etc. system_directory = /home/pi/RetroPie/emulatorcores/ # Sets start directory for RGUI ROM browser. # rgui_browser_directory = # Sets start directory for RGUI config browser. # rgui_config_directory = # Show startup screen in RGUI. # Is automatically set to false when seen for the first time. # This is only updated in config if config_save_on_exit is set to true, however. # rgui_show_start_screen = true # Flushes config to disk on exit. Useful for RGUI as settings can be modified. # Overwrites the config. #include's and comments are not preserved. # config_save_on_exit = false #### Video # Video driver to use. "gl", "xvideo", "sdl" # video_driver = "gl" # Which OpenGL context implementation to use. # Possible ones for desktop are: glx, x-egl, kms-egl, sdl-gl, wgl. # By default, tries to use first suitable driver. # video_gl_context = # Windowed xscale and yscale # (Real x res: base_size * xscale * aspect_ratio, real y res: base_size * yscale) # video_xscale = 3.0 # video_yscale = 3.0 # Fullscreen resolution. Resolution of 0 uses the resolution of the desktop. # video_fullscreen_x = 0 # video_fullscreen_y = 0 # Start in fullscreen. Can be changed at runtime. # video_fullscreen = false # If fullscreen, prefer using a windowed fullscreen mode. # video_windowed_fullscreen = true # Which monitor to prefer. 0 (default) means no particular monitor is preferred, 1 and up (1 being first monitor), # suggests RetroArch to use that particular monitor. # video_monitor_index = 0 # Forcibly disable composition. Only works in Windows Vista/7 for now. # video_disable_composition = false # Video vsync. # video_vsync = true # Attempts to hard-synchronize CPU and GPU. Can reduce latency at cost of performance. # video_hard_sync = false # Sets how many frames CPU can run ahead of GPU when using video_hard_sync. # Maximum is 3. # video_hard_sync_frames = 0 # Inserts a black frame inbetween frames. # Useful for 120 Hz monitors who want to play 60 Hz material with eliminated ghosting. # video_refresh_rate should still be configured as if it is a 60 Hz monitor (divide refresh rate by 2). # video_black_frame_insertion = false # Use threaded video driver. Using this might improve performance at possible cost of latency and more video stuttering. # video_threaded = false # Smoothens picture with bilinear filtering. Should be disabled if using pixel shaders. video_smooth = false # Forces rendering area to stay equal to game aspect ratio or as defined in video_aspect_ratio. # video_force_aspect = true # Only scales video in integer steps. # The base size depends on system-reported geometry and aspect ratio. # If video_force_aspect is not set, X/Y will be integer scaled independently. # video_scale_integer = false # A floating point value for video aspect ratio (width / height). # If this is not set, aspect ratio is assumed to be automatic. # Behavior then is defined by video_aspect_ratio_auto. video_aspect_ratio = 1.33 # If this is true and video_aspect_ratio is not set, # aspect ratio is decided by libretro implementation. # If this is false, 1:1 PAR will always be assumed if video_aspect_ratio is not set. # video_aspect_ratio_auto = false # Forces cropping of overscanned frames. # Exact behavior of this option is implementation specific. # video_crop_overscan = true # Path to shader. Shader can be either Cg, CGP (Cg preset) or XML/GLSL format if support is enabled. # video_shader = "/path/to/shader.{cg,cgp,shader}" # Load video_shader on startup. # Other shaders can still be loaded later in runtime. # video_shader_enable = false # Defines a directory where shaders (Cg, CGP, XML) are kept for easy access. # video_shader_dir = # CPU-based filter. Path to a bSNES CPU filter (*.filter) # video_filter = # Path to a TTF font used for rendering messages. This path must be defined to enable fonts. # Do note that the _full_ path of the font is necessary! # video_font_path = # Size of the TTF font rendered. # video_font_size = 48 # Attempt to scale the font to fit better for multiple window sizes. # video_font_scale = true # Enable usage of OSD messages. # video_font_enable = true # Offset for where messages will be placed on screen. Values are in range 0.0 to 1.0 for both x and y values. # [0.0, 0.0] maps to the lower left corner of the screen. # video_message_pos_x = 0.05 # video_message_pos_y = 0.05 # Color for message. The value is treated as a hexadecimal value. # It is a regular RGB hex number, i.e. red is "ff0000". # video_message_color = ffffff # Video refresh rate of your monitor. # Used to calculate a suitable audio input rate. # video_refresh_rate = 59.95 # Allows libretro cores to set rotation modes. # Setting this to false will honor, but ignore this request. # This is useful for vertically oriented games where one manually rotates the monitor. # video_allow_rotate = true # Forces a certain rotation of the screen. # The rotation is added to rotations which the libretro core sets (see video_allow_rotate). # The angle is <value> * 90 degrees counter-clockwise. # video_rotation = 0 #### Audio # Enable audio. # audio_enable = true # Audio output samplerate. audio_out_rate = 48000 # Audio driver backend. Depending on configuration possible candidates are: alsa, pulse, oss, jack, rsound, roar, openal, sdl, xaudio. audio_driver = alsathread # Override the default audio device the audio_driver uses. This is driver dependant. E.g. ALSA wants a PCM device, OSS wants a path (e.g. /dev/dsp), Jack wants portnames (e.g. system:playback1,system:playback_2), and so on ... # audio_device = # External DSP plugin that processes audio before it's sent to the driver. # audio_dsp_plugin = # Will sync (block) on audio. Recommended. # audio_sync = true # Desired audio latency in milliseconds. Might not be honored if driver can't provide given latency. # audio_latency = 64 # Enable experimental audio rate control. # audio_rate_control = true # Controls audio rate control delta. Defines how much input rate can be adjusted dynamically. # Input rate = in_rate * (1.0 +/- audio_rate_control_delta) # audio_rate_control_delta = 0.005 # Audio volume. Volume is expressed in dB. # 0 dB is normal volume. No gain will be applied. # Gain can be controlled in runtime with input_volume_up/input_volume_down. # audio_volume = 0.0 #### Input # Input driver. Depending on video driver, it might force a different input driver. # input_driver = sdl # Joypad driver. (Valid: linuxraw, sdl, dinput) # input_joypad_driver = # Defines axis threshold. Possible values are [0.0, 1.0] # input_axis_threshold = 0.5 # Path to input overlay # input_overlay = # Overlay opacity # input_overlay_opacity = 1.0 # Overlay scale # input_overlay_scale = 1.0 # Enable input auto-detection. Will attempt to autoconfigure # joypads, Plug-and-Play style. # input_autodetect_enable = true # Directory for joypad autoconfigs (PC). # If a joypad is plugged in, that joypad will be autoconfigured if a config file # corresponding to that joypad is present in joypad_autoconfig_dir. # Input binds which are made explicit (input_playerN_*_btn/axis) will take priority over autoconfigs. # Autoconfigs can be created with retroarch-joyconfig, manually, or with a frontend. # Requires input_autodetect_enable to be enabled. # joypad_autoconfig_dir = # Enable debug input key reporting on-screen. # input_debug_enable = false # Sets which libretro device is used for a player. # Devices are indentified with a number. # This is normally saved by RGUI. # Device IDs are found in libretro.h. # These settings are overridden by explicit command-line arguments which refer to input devices. # None: 0 # Joypad (RetroPad): 1 # Mouse: 2 # Keyboard: 3 # Generic Lightgun: 4 # Joypad w/ Analog (RetroPad + Analog sticks): 5 # Multitap (SNES specific): 257 # Super Scope (SNES specific): 260 # Justifier (SNES specific): 516 # Justifiers (SNES specific): 772 # input_libretro_device_p1 = # input_libretro_device_p2 = # input_libretro_device_p3 = # input_libretro_device_p4 = # input_libretro_device_p5 = # input_libretro_device_p6 = # input_libretro_device_p7 = # input_libretro_device_p8 = # Keyboard input. Will recognize normal keypresses and special keys like "left", "right", and so on. # Keyboard input, Joypad and Joyaxis will all obey the "nul" bind, which disables the bind completely, # rather than relying on a default. # input_player1_a = x # input_player1_b = z # input_player1_y = a # input_player1_x = s # input_player1_start = enter # input_player1_select = rshift # input_player1_l = q # input_player1_r = w # input_player1_left = left # input_player1_right = right # input_player1_up = up # input_player1_down = down # input_player1_l2 = # input_player1_r2 = # input_player1_l3 = # input_player1_r3 = # Two analog sticks (DualShock-esque). # Bound as usual, however, if a real analog axis is bound, # it can be read as a true analog. # Positive X axis is right, Positive Y axis is down. input_player1_joypad_index = 0 input_player1_b_btn = 1 input_player1_y_btn = 0 input_player1_select_btn = 8 input_player1_start_btn = 9 input_player1_up_axis = -5 input_player1_down_axis = +5 input_player1_left_axis = -4 input_player1_right_axis = +4 input_player1_a_btn = 2 input_player1_x_btn = 3 input_player1_l_btn = 4 input_player1_r_btn = 5 input_player1_l2_btn = 6 input_player1_r2_btn = 7 input_player1_l3_btn = 10 input_player1_r3_btn = 11 input_player1_l_x_plus_axis = +0 input_player1_l_x_minus_axis = -0 input_player1_l_y_plus_axis = +1 input_player1_l_y_minus_axis = -1 input_player1_r_x_plus_axis = +2 input_player1_r_x_minus_axis = -2 input_player1_r_y_plus_axis = +3 input_player1_r_y_minus_axis = -2 input_enable_hotkey_btn = 8 input_exit_emulator_btn = 9 # If desired, it is possible to override which joypads are being used for player 1 through 8. # First joypad available is 0. input_player1_joypad_index = 0 # input_player2_joypad_index = 1 # input_player3_joypad_index = 2 # input_player4_joypad_index = 3 # input_player5_joypad_index = 4 # input_player6_joypad_index = 5 # input_player7_joypad_index = 6 # input_player8_joypad_index = 7 # Joypad buttons. # Figure these out by using RetroArch-Phoenix or retroarch-joyconfig. # You can use joypad hats with hnxx, where n is the hat, and xx is a string representing direction. # E.g. "h0up" # input_player1_a_btn = 0 # input_player1_b_btn = 1 # input_player1_y_btn = 3 # input_player1_x_btn = 2 # input_player1_start_btn = 7 # input_player1_select_btn = 6 # input_player1_l_btn = 4 # input_player1_r_btn = 5 # input_player1_left_btn = # input_player1_right_btn = # input_player1_up_btn = # input_player1_down_btn = # input_player1_l2_btn = # input_player1_r2_btn = # input_player1_l3_btn = # input_player1_r3_btn = # Axis for RetroArch D-Pad. # Needs to be either '+' or '-' in the first character signaling either positive or negative direction of the axis, then the axis number. # Do note that every other input option has the corresponding _btn and _axis binds as well; they are omitted here for clarity. # input_player1_left_axis = -0 # input_player1_right_axis = +0 # input_player1_up_axis = -1 # input_player1_down_axis = +1 # Holding the turbo while pressing another button will let the button enter a turbo mode # where the button state is modulated with a periodic signal. # The modulation stops when the button itself (not turbo button) is released. # input_player1_turbo = # Describes the period and how long of that period a turbo-enabled button should behave. # Numbers are described in frames. # input_turbo_period = 6 # input_turbo_duty_cycle = 3 # This goes all the way to player 8 (*_player2_*, *_player3_*, etc), but omitted for clarity. # All input binds have corresponding binds for keyboard (none), joykeys (_btn) and joyaxes (_axis) as well. # Toggles fullscreen. # input_toggle_fullscreen = f # Saves state. # input_save_state = f2 # Loads state. # input_load_state = f4 # State slots. With slot set to 0, save state name is *.state (or whatever defined on commandline). # When slot is != 0, path will be $path%d, where %d is slot number. # input_state_slot_increase = f7 # input_state_slot_decrease = f6 # Toggles between fast-forwarding and normal speed. # input_toggle_fast_forward = space # Hold for fast-forward. Releasing button disables fast-forward. # input_hold_fast_forward = l # Key to exit emulator cleanly. # Killing it in any hard way (SIGTERM, SIGKILL, etc, will terminate emulator without saving RAM, etc.) input_exit_emulator = escape # Applies next and previous XML/Cg shader in directory. # input_shader_next = m # input_shader_prev = n # Hold button down to rewind. Rewinding must be enabled. input_rewind = r # Toggle between recording and not. # input_movie_record_toggle = o # Toggle between paused and non-paused state # input_pause_toggle = p # Frame advance when game is paused # input_frame_advance = k # Reset the game. # input_reset = h # Configures DSP plugin # input_dsp_config = c # Cheats. # input_cheat_index_plus = y # input_cheat_index_minus = t # input_cheat_toggle = u # Mute/unmute audio # input_audio_mute = f9 # Take screenshot # input_screenshot = f8 # Netplay flip players. # input_netplay_flip_players = i # Hold for slowmotion. # input_slowmotion = e # Enable other hotkeys. # If this hotkey is bound to either keyboard, joybutton or joyaxis, # all other hotkeys will be disabled unless this hotkey is also held at the same time. # This is useful for RETRO_KEYBOARD centric implementations # which query a large area of the keyboard, where it is not desirable # that hotkeys get in the way. # Alternatively, all hotkeys for keyboard could be disabled by the user. # input_enable_hotkey = # Increases audio volume. # input_volume_up = kp_plus # Decreases audio volume. # input_volume_down = kp_minus # Toggles to next overlay. Wraps around. # input_overlay_next = # Toggles eject for disks. Used for multiple-disk games. # input_disk_eject_toggle = # Cycles through disk images. Use after ejecting. # Complete by toggling eject again. # input_disk_next = # Toggles RGUI menu. # input_menu_toggle = f1 # Toggles mouse grab. When mouse is grabbed, RetroArch hides the mouse, # and keeps the mouse pointer inside the window to allow relative mouse games # to work better. # input_grab_mouse_toggle = f11 #### Misc # Enable rewinding. This will take a performance hit when playing, so it is disabled by default. rewind_enable = true # Rewinding buffer size in megabytes. Bigger rewinding buffer means you can rewind longer. # The buffer should be approx. 20MB per minute of buffer time. rewind_buffer_size = 10 # Rewind granularity. When rewinding defined number of frames, you can rewind several frames at a time, increasing the rewinding speed. rewind_granularity = 2 # Pause gameplay when window focus is lost. # pause_nonactive = true # Autosaves the non-volatile SRAM at a regular interval. This is disabled by default unless set otherwise. # The interval is measured in seconds. A value of 0 disables autosave. # autosave_interval = # When being client over netplay, use keybinds for player 1. # netplay_client_swap_input = false # Path to XML cheat database (as used by bSNES). # cheat_database_path = # Path to XML cheat config, a file which keeps track of which # cheat settings are used for individual games. # If the file does not exist, it will be created. # cheat_settings_path = # Directory to dump screenshots to. # screenshot_directory = # Records video after CPU video filter. # video_post_filter_record = false # Records output of GPU shaded material if available. # video_gpu_record = false # Screenshots output of GPU shaded material if available. # video_gpu_screenshot = true # Block SRAM from being overwritten when loading save states. # Might potentially lead to buggy games. # block_sram_overwrite = false # When saving a savestate, save state index is automatically increased before # it is saved. # Also, when loading a ROM, the index will be set to the highest existing index. # There is no upper bound on the index. # savestate_auto_index = false # Slowmotion ratio. When slowmotion, game will slow down by factor. # slowmotion_ratio = 3.0 # The maximum rate at which games will be run when using fast forward. (E.g. 5.0 for 60 fps game => 300 fps cap). # RetroArch will go to sleep to ensure that the maximum rate will not be exceeded. # Do not rely on this cap to be perfectly accurate. # A negative ratio equals no FPS cap. # fastforward_ratio = -1.0 # Enable stdin/network command interface. # network_cmd_enable = false # network_cmd_port = 55355 # stdin_cmd_enable = false # input_enable_hotkey_btn = 6 # input_exit_emulator_btn = 7 # input_rewind_btn = 3 # input_save_state_btn = 4 # input_load_state_btn = 5 # input_player2_a_btn = 0 # input_player2_b_btn = 1 # input_player2_x_btn = 2 # input_player2_y_btn = 3 # input_player2_l_btn = 4 # input_player2_r_btn = 5 # input_player2_start_btn = 7 # input_player2_select_btn = 6 # input_player2_left_axis = -0 # input_player2_right_axis = +0 # input_player2_up_axis = -1 # input_player2_down_axis = +1This tutorial shows how to get one to four wiimotes (the controller of Nintendo Wii) running with RetroPi with or without a classic controller (attached to the wiimote).
Prerequisites
1. For the following I assume that RetroPi was installed and is running with other controls (like keyboard, joystick etc.). I followed the excellent tutorial http://supernintendopi.wordpress.com/2013/01/23/an-a-to-z-beginners-guide-to-installing-retropie-on-a-raspberry-pi/ for this (using the “RetroPie Project SD Card Image”).
2. You have a blue-tooth dongle (sometimes called blue-tooth adapter). For a list of dongles known to work with Raspberry Pi see http://elinux.org/RPi_USB_Bluetooth_adapters#Working_Bluetooth_adapters ).
Note: Put the dongle in one of the USB ports of the Raspberry Pi directly, don’t put it into a USB hub (I read somewhere that it doesn’t work even with an active USB hub).
Installation
Now install the needed parts:
sudo apt-get install bluetooth
sudo apt-get install python-cwiid
sudo apt-get install wminput
Getting the wiimotes to work
. uinput device needs to work with non-root users. To do so, create a file called /etc/udev/rules.d/wiimote.rules with the following line:
KERNEL==“uinput“, MODE:=“0666“Reboot the Raspberry Pi to make this change active.
. Check that the blue-tooth dongle works: Command
/etc/init.d/bluetooth status
should return that bluetooth is working. Scan for the wiimotes. Start
hcitool scan
and press 1+2 on your wiimote(s). After a short while, the output should be something likeScanning ... 00:19:1D:87:90:38 Nintendo RVL-CNT-01 00:19:1D:88:EF:12 Nintendo RVL-CNT-01Take a note of the addresses of your wiimotes (the 00:19:1D:87:90:38 in the output above), we need that later.
Note: If the scan is not successful try it again. Sometimes you need to try it several times (I read that somewhere, but it always worked for me the first time).. Correct usage of wminput
For every wiimote, we need one wminput command to map the wiimote (and the classic controller) buttons to something emulationstation and the emulators can work with. wminput comes with configuration files (in directory /etc/cwiid/wminput). I created my own configuration file, which works if you use a wiimote with or without a classic controller. Create the file /home/pi/mywminput with the following content:Classic.Dpad.X = ABS_X Classic.Dpad.Y = ABS_Y Classic.LStick.X = ABS_HAT0X Classic.LStick.Y = ABS_HAT0Y Classic.RStick.X = ABS_HAT1X Classic.RStick.Y = ABS_HAT1Y Classic.A = BTN_A Classic.B = BTN_B Classic.X = BTN_X Classic.Y = BTN_Y Classic.Minus = BTN_SELECT Classic.Plus = BTN_START Classic.Home = BTN_MODE Classic.L = BTN_TL Classic.R = BTN_TR Classic.ZL = BTN_TL2 Classic.ZR = BTN_TR2 Wiimote.A = BTN_A Wiimote.B = BTN_B Wiimote.Dpad.X = -ABS_Y Wiimote.Dpad.Y = ABS_X Wiimote.Minus = BTN_SELECT Wiimote.Plus = BTN_START Wiimote.Home = BTN_MODE Wiimote.1 = BTN_X Wiimote.2 = BTN_YIf the Raspberry Pi is started and emulationstation starts, we want to register the wiimotes so they can be used with emulationstation and the emulators.
I did it the following way:
mkdir /home/pi/bin
create file /home/pi/bin/attachwii.sh with the following content:#!/bin/bash hcitool dev | grep hci >/dev/null if test $? -eq 0 ; then wminput -d -c /home/pi/mywminput 00:19:1D:92:90:38 & wminput -d -c /home/pi/mywminput 00:19:1D:84:EF:33 & else echo "Blue-tooth adapter not present!" fiNote: You need one wminput line for every wiimote you want to use (i.e. the above is for two wiimotes)
Note 2: You need to replace the addresses of the wiimotes above by the addresses of your wiimotes (shown by command „hcitool scan“ as shown above).
make the script executable with
chmod 775 /home/pi/bin/attachwii.sh
have the script be started just before emulationstation starts. To do so, edit the file /etc/profile
The last line should be
[ -n "${SSH_CONNECTION}" ] || emulationstation
right before this line, add the line
/home/pi/bin/attachwii.sh
and save the file.If you now do a reboot, wait until emulationstation has been started. When it did, press 1+2 on all of your wiimotes to register the wiimotes. Now you can „tell“ emulationstation and the emulators to use the wiimotes (and the classic controllers). Here are my configuration files.
For emulationstation:
Content of /home/pi/.emulationstation/es_input.cfg for two wiimotes:<?xml version="1.0"?> <inputList> <inputConfig type="joystick" deviceName="Nintendo Wiimote"> <input name="a" type="button" id="0" value="1" /> <input name="b" type="button" id="1" value="1" /> <input name="down" type="axis" id="1" value="-1" /> <input name="left" type="axis" id="0" value="-1" /> <input name="menu" type="button" id="2" value="1" /> <input name="pagedown" type="button" id="4" value="1" /> <input name="pageup" type="button" id="5" value="1" /> <input name="right" type="axis" id="0" value="1" /> <input name="select" type="button" id="3" value="1" /> <input name="up" type="axis" id="1" value="1" /> </inputConfig> <inputConfig type="joystick" deviceName="Nintendo Wiimote"> <input name="a" type="button" id="0" value="1" /> <input name="b" type="button" id="1" value="1" /> <input name="down" type="axis" id="1" value="-1" /> <input name="left" type="axis" id="0" value="-1" /> <input name="menu" type="button" id="2" value="1" /> <input name="pagedown" type="button" id="4" value="1" /> <input name="pageup" type="button" id="5" value="1" /> <input name="right" type="axis" id="0" value="1" /> <input name="select" type="button" id="3" value="1" /> <input name="up" type="axis" id="1" value="1" /> </inputConfig> <inputConfig type="keyboard"> <input name="a" type="key" id="13" value="1" /> <input name="b" type="key" id="8" value="1" /> <input name="down" type="key" id="274" value="1" /> <input name="left" type="key" id="276" value="1" /> <input name="menu" type="key" id="32" value="1" /> <input name="right" type="key" id="275" value="1" /> <input name="up" type="key" id="273" value="1" /> </inputConfig> </inputList>For retroarch:
End of file /home/pi/RetroPi/configs/all/retroarch.cfg (for two wiimotes):input_player1_joypad_index = "0" input_player1_b_btn = "0" input_player1_y_btn = "2" input_player1_select_btn = "8" input_player1_start_btn = "9" input_player1_up_axis = "+1" input_player1_down_axis = "-1" input_player1_left_axis = "-0" input_player1_right_axis = "+0" input_player1_a_btn = "1" input_player1_x_btn = "3" input_player1_l_btn = "4" input_player1_r_btn = "5" input_player1_l2_btn = "6" input_player1_r2_btn = "7" input_player1_l3_btn = "10" input_player1_r3_btn = "10" input_player1_l_x_plus_axis = "+2" input_player1_l_x_minus_axis = "-2" input_player1_l_y_plus_axis = "-3" input_player1_l_y_minus_axis = "+3" input_player1_r_x_plus_axis = "+4" input_player1_r_x_minus_axis = "-4" input_player1_r_y_plus_axis = "-5" input_player1_r_y_minus_axis = "+5" input_player2_joypad_index = "1" input_player2_b_btn = "1" input_player2_y_btn = "3" input_player2_select_btn = "8" input_player2_start_btn = "9" input_player2_up_axis = "+1" input_player2_down_axis = "-1" input_player2_left_axis = "-0" input_player2_right_axis = "+0" input_player2_a_btn = "0" input_player2_x_btn = "2" input_player2_l_btn = "4" input_player2_r_btn = "5" input_player2_l2_btn = "6" input_player2_r2_btn = "7" input_player2_l3_btn = "10" input_player2_r3_btn = "10" input_player2_l_x_plus_axis = "+2" input_player2_l_x_minus_axis = "-2" input_player2_l_y_plus_axis = "-3" input_player2_l_y_minus_axis = "+3" input_player2_r_x_plus_axis = "+4" input_player2_r_x_minus_axis = "-4" input_player2_r_y_plus_axis = "-5" input_player2_r_y_minus_axis = "+5"Make sure that the settings are only one time in retroarch.cfg file (i.e. if you have a line
input_player1_b_btn = "0"
in the retroarch.cfg file before adding my lines, remove (or out-comment) the whole section. If you want to use more than two wiimotes, search for the line
input_player1_joypad_index = 0
in retroarch.cfg and add the a corresponding line for the other wiimotes. For example you should have the following lines in retroarch.cfg for four wiimotes:input_player1_joypad_index = 0 input_player2_joypad_index = 1 input_player3_joypad_index = 2 input_player4_joypad_index = 3Finally, add the following two lines at the end of /home/pi/RetroPi/configs/all/retroarch.cfg:
input_enable_hotkey_btn = "0"
input_exit_emulator_btn = "1"
This will exit the emulator when you press A+B simultaneously on the wiimote (or the classic controller).
Note: the config files above work for wiimotes with or without classic controller.
Note 2: If you want to use the wiimote (i.e. not only the classic controller) and you are using my config files, you need to hold the wiimote horizontally (with the power button on the right).Hope that helps.
Topic: Controller issues
So I finally found this site after about a month of trying to fix my controller problems with my limited RPi knowledge. I bought 2 of these controllers to use.
I plugged them into my computer to make sure they work and didn’t have any issues. However when I have them plugged into the RPi, everything kind of goes haywire. Even with it sitting on the ground, buttons seem to get pressed at random. I ran the JSTest function and that just confirms that the controller is going crazy. Is there a specific driver I need to install? Or could it just be the cheap quality of the controllers?
Any help is greatly appreciated. Thanks!
Topic: Super Nintendo GamePad issue
Hello there,
I am fighting with the retropie for more than a day now. I have everything working excepted the snes emulator. So I can launch it no problem but can’t use my usb gamepad…
Now I saw couple of thread where they talk about a fold Retroarch/tools but I don’t have that folder.Can someone can help me please ?
By the way my installation is based on the latest image.
thank

I really don’t want to spend too much money on a controller. Would this one work? If not, what cheap controllers (~$10) would be best for RetroPie?
Hello everyone, i need help. nad i think you guys can help me out.
I got my raspberry with retropie on it, it works great. i also got the GPIO Adaptor från petrock. and everything is working great.
So my question is. Can i use this switch (http://mausberrycircuits.com/products/direct-plug-shutdown-switch-with-rocker)
even if i got the GPIO adaptor on all the GPIO pins? Because as you can see this switch needs 2 pins of the GPIO to functional as a “safe shutdown” (sends the halt command etc etc.)so is it possibly for me to have 2 things useing the same GPIO pins without the raspberry will freak out?!
Thanks for answers, love the blog, forum! and retropie!
Greetings Jerry
Topic: Frozen at Splash Screen
So, I have set everything up and things seemed to be working fine. I mapped usb snes controller, rebooted and now I am stuck on the splash screen. No matter what I do, I can’t get to command line interface. I’m looking for help, if you need any more info, just let me. Thanks!!
Topic: My RetroPie Project

The box has enough room for the Xbox 360 Controller, Xbox charge cable, wireless receiver, micro usb cable, and power supply.I painted the box yellow and let it dry. Then I used a projector to trace the question block logo off of Super Mario Brothers onto a folder and cut it out. I did the dark grey first and let it dry overnight. Once it was dry I did the orange.
Currently it has NES, SNES, and SEGA emulators. It uses an xbox wireless receiver and a 360 controller to play the games.
For more information including a demo video, check out: http://dustinevans.net/retropie.php
Hi,
I’m using the latest RetroPie SD card image and have run into problems in setting up the controller for use with emulationstation. It recognizes my Dualshock 3 controller but when I go to map the individual buttons things start to go wrong. When holding down a button to skip P2, it automatically maps ‘up’. When I go to map ‘down’ it does ‘down’ and ‘left’, when I map ‘right’ it does ‘right’ and ‘accept’ etc. I’ve tried with both of my Dualshock 3 controllers. Could someone guide a Pi illiterate through what it probably some rookie error on my part? Thanks :)I tried to use the Retro Link NES Controller USB adapter with RetroPie, however upon launching EmulationStation, the “Up” button and the “left” button on my NES controller is not recognized during configuration.
I plugged it in on my PC, and tested every button with Windows’ game controller setup, and everything is working fine, same on my Mac.
Is there any way I can get my controller/adapter working properly on my Raspberry? Any drivers I can install?
Topic: Super Pitendo
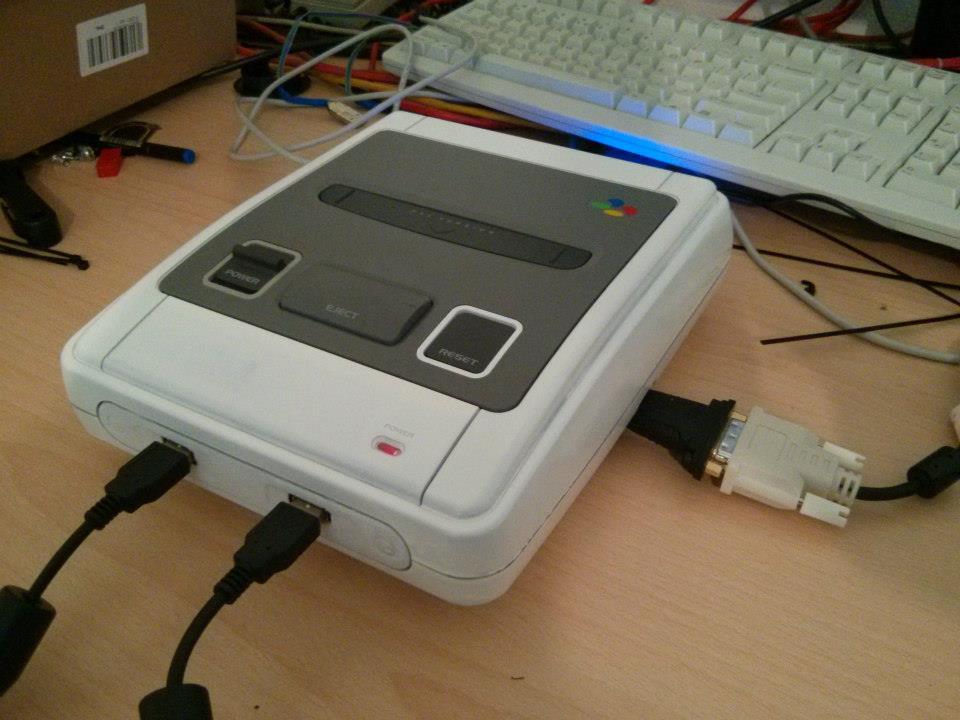
I almost finished my Super Pitendo Project an want to share a few Pics with the Community.
It’s an old german PAL Super Nintendo Console. I removed every unnecessary plastic parts and the cartridge slot to get enough space for the following system parts:
– Raspberry Pi Model B rev 1
– 8 Port powered USB Hub
– Logilink USB Soundcard
– Shutdown circuit from Mausberry Circuits
– self made Resetbutton
– self made Powerled
– self made USB Controller-PortsThe Raspberry is powered via the USB Hub. The original Nintendo Powerswitch is soldered to the shutdown circuit. If you turn the Console off, the shutdown circuit send the shutdown command to the Pi and after the shutdown it cuts the power.
When pressing the Reset Button on the SNES it will bring you back to Emulatorstation. Therefore I changed the sourcecode from SNESdev and removed everything exept the exit command.
On the back you have 3 cinch plugs to connect the system to a SCART cabel, a LAN Port, a Mainpower-LED and a Mainpower Switch for the USB Hub.
The HDMI Port is on the right side and 4 USB ports are on the left side.
The next step is to add the Super Pitendo Logo to the Case and improvements to the paint.