-
Search Results
-
RPi2, Retropie 3.1.
Hey everyone, I’m building my own arcade machine and I would like to simply change the controller settings for Mupen64 to recognize my joysticks as the analog stick. I have properly setup a Xin-Mo/THT THT Arcade console 2p USB Player, and it recognizes the joysticks as a D-Pad for every working system, but I would like to switch it to the analog stick specifically for N64 games.
I have tried looking through the config files mentioned here: https://github.com/RetroPie/RetroPie-Setup/wiki/Nintendo-64%5B1%5D . I have also tried following some of the steps in this video: https://www.youtube.com/watch?v=lh0n5PWN2lI but I haven’t discovered the exact change that I need to make.
If anyone can help me with this I would greatly appreciate it!
Here is a picture of the controls: http://i.imgur.com/zOO294z.jpg
Today I installed the new RetroPie 3.2 on my Raspberry Pi 2 and encountered a strange problem with my iBuffalo Classic USB Gamepad.
It worked fine on all older RetroPie versions and RetroArch on my notebook. But with RP 3.2, the d-pad isn’t working anymore … kind of. Everything works fine in Emulationstation, in the ncurses menus, I even can navigate the runcommand menu. But when the game starts, the d-pad axis don’t work. To be accurate: I can switch the savestates by using the hotkey button in combination with left or right. But otherwise, I get no response. Pressing buttons in RGUI? No problem. But using the d-pad? No chance.
I configured the gamepad via Emulationstation, tried the RetroArch Autoconfig, looked for something messed up in the retroarch.cfg, deleted the cfg for the gamepad a few times – nothing helps.
This is a rather odd problem. My Xbox 360 gamepad works as it should (but you know, it has a veery crappy d-pad). Any help would be appreciated, thx in advance. :-)
Not sure if there is a way to do this, but I have 3 different USB controllers and when I use one of my gamepads with FBA, I want to swap the L and R buttons and only with that controller. My other controller is an arcade stick and its mapping of L and R are where I want them to be. Is there a way in the retroarch.cfg for the fba emulator to change the input mapping per controller and not just per player #?
EDIT: I figured it out thanks to a reddit post. I had to copy the controller configuration into the emulator folder then point the retroarch.cfg to it.
pi@retropie:/opt/retropie/configs/fba/retroarch-joypads$ ls
LogitechLogitechDualAction.cfg MY-POWERCO.,LTD.USBJoystick.cfgin retroarch.cfg for fba:
joypad_autoconfig_dir = /opt/retropie/configs/fba/retroarch-joypadsNow my Logitech controller is specific for FBA.
I did though have to copy all my joystick configs to this folder since it overwrites the main config dir in the main script and couldn’t find my other joysticks now for FBA.
Topic: Gasia Co.,Ltd PS(R) Gamepad
Hi !
Pi Model:2 B
RetroPie Version Used: 3.2
Built From: SD Image
Guide used: wiki
USB Devices connected:
Bus 001 Device 005: ID 0a12:0001 Cambridge Silicon Radio, Ltd Bluetooth Dongle (HCI mode)
Controller used: Gasia Co.,Ltd PS(R) Gamepad
Bus 001 Device 006: ID 054c:0268 Sony Corp. Batoh Device / PlayStation 3 ControllerError messages received: none
pi@retropie ~ $ hcitool scan
Scanning …
pi@retropie ~ $ hcitool dev
Devices:
hci0 00:11:F6:0B:28:9Ehow to configure this gamepad ???
thank you for your help !
M@rco
Topic: My Play Center
This is my favourite Play Center:
[attachment file=”20151012_133005.jpg”]
Inside:
[attachment file=”20151012_133030.jpg”]
It have one industrial 5A power supply, one stripped chinese XBOX 360 wireless receiver, USB WIFI dongle and remote keyboard USB dongle plugged.
For me, the best ever console !!!
Topic: Noisy Audio
I can’t use HDMI audio for the project I have on at the moment, but the sound I’m getting from other methods is terrible.
I’ve tried both the 3.5mm jack and a USB adapter and both are very noisy / crackly. I’ve done a search on here and tried all the methods I could find; dither settings etc. but none have worked. I’m sending the audio from the pi into a small amp (the amp works perfectly crackle-free when connected to my phone).
I’m wondering if anyone else here has had bad sound output, and how they fixed it.
Thanks!Hello everyone,
I’m very new to all this, but have been reading and gathering as much information as possible.
I’m desperately trying to run Atari 800 games ( I have the .ATR files)and placed them in the correct location, I also downloaded and placed the 5 emulators in the /home/pi/RetroPie/BIOS folder.
When trying to load an image, I just get the error you need to use a real OS.
I have pressed F1 and gone through the settings on the emulator and to be honest I next to no idea what I’m doing…
Could some kind soul please explain in steps what I need to do in order to get things running please? and also how to configure a usb snes pad to work on this?
Regards
Loccen
Topic: N64 Emulator Exit Command
Hello All,
I am trying to setup a USB N64 controller to work with my Retropie. The issue I am running into is this:
By default with this controller mapped properly to match the corresponding buttons the start button will cause the rom to exit back to the main menu. I am not sure if this is because the select button is not mapped as there isn’t one on the joystick or not.
I am thinking that a good solution might be to change the exit command from the start button to a key on the keyboard like escape. As you can imagine assigning the exit key to any one button on the native joystick would be problematic. So is there a way to map a key from the keyboard and not a joystick to the exit command? If so how could I do it and which config file would I append to make this happen?Thanks for your time :)
Pi Model: 2
RetroPie Version Used: 3.1
Built From: SD Image
USB Devices connected: Keyboard, USB N64 Controller
Controller used: USB N64
How to replicate the problem: The Start button closes the rom, and in most cases start is highly used key on n64 roms-Oro
Topic: VIRTUAL KEYBOARD
will retropie support virtual keyboard for us who are cheap to get usb keyboards?
I’m trying to map the controls, but I get a timed out. I’m relatively confident that I’ve got this thing wired properly. Here are my specs:
Pi Model: 2B
RetroPie Version Used: 3.1Built From: SD Image
USB Devices connected: X-Arcade DIY
Controller used: X-Arcade DIY
Error messages received:
B button (down)
Timed out …etc.
Guides Help used:
Xarcade2Jstick – Map your Xarcade Tankstick to Game Pads and use it with RetroPie
Output of lsinput:
/dev/input/event0
bustype : BUS_USB
vendor : 0xaa55
product : 0x101
version : 272
name : “XGaming X-Arcade”
phys : “usb-3f980000.usb-1.4/input0”
uniq : “”
bits ev : EV_SYN EV_KEY EV_MSC EV_LED EV_REP/dev/input/event1
bustype : BUS_USB
vendor : 0xaa55
product : 0x101
version : 272
name : “XGaming X-Arcade”
phys : “usb-3f980000.usb-1.4/input1”
uniq : “”
bits ev : EV_SYN EV_KEY EV_MSC EV_LED EV_REP/dev/input/event2
bustype : BUS_USB
vendor : 0x1
product : 0x1
version : 4
name : “Xarcade-to-Gamepad Device”
bits ev : EV_SYN EV_KEY EV_REL EV_ABS/dev/input/event3
bustype : BUS_USB
vendor : 0x1
product : 0x1
version : 4
name : “Xarcade-to-Gamepad Device”
bits ev : EV_SYN EV_KEY EV_REL EV_ABS/dev/input/event4
bustype : BUS_USB
vendor : 0x1
product : 0x1
version : 4
name : “SNES-to-Keyboard Device”
bits ev : EV_SYN EV_KEY EV_RELOutput of ls /dev/input:
by-id by-path event0 event1 event2 event3 event4 event5 js0 js1 mice
Output of jstest /dev/input/js0:
Driver version is 2.1.0.
Joystick (Xarcade-to-Gamepad Device) has 2 axes (X, Y)
and 10 buttons (BtnX, BtnY, BtnZ, BtnTL, BtnTR, BtnTL2, BtnTR2, BtnSelect, BtnThumbL, BtnThumbR).
Testing … (interrupt to exit)
Axes: 0:-32767 1:-32767 Buttons: 0:off 1:off 2:off 3:off 4:off 5:off 6:off 7:off 8:off 9:offHope I put in enough information here. This is definitely above my pay grade. Any help would be grrrrreeeeeeeaaaaaaat.
TIA
Topic: Video Drops Off Periodically
Hello All,
I just bought a Raspberry Pi 2 and set up the most recent version of Retropie on it. So far loving the work that was put into all of this. I am however running into a pretty serious issue with it. Periodically the display just cuts out completely after a few seconds it will return but this happens about every 20-30 seconds. This is not just isolated to the roms, it happens in the Emulation Station menu as well. The only place that doesn’t seem affected is the command line when I tap F4. I have tried both overscan modes in the main menus but neither seem to affect this. I have also tested multiple HDMI cables and verified multiple ports on the television against other devices and see no issues. I get the feeling it is a setting somewhere but I am not sure where to begin. Has anyone seen an issue where all video out just drops off for a few seconds a few times a minute?Pi Model: 2
RetroPie Version Used: 3.1
Built From: SD Image
USB Devices connected: USB Keyboard, 8 button USB SNES Controller
Controller used:SNES Controller
Error messages received: No error message, just video drops off and comes back frequently
How to replicate the problem: Just wait at the Emulation Station menu or in a loaded rom, it happens on its own.Topic: Midnight Commander slow
Hi, I am transferring files over to usb to back up my roms and saves using Midnight Commander built in to the retropie menu. Usually I get transfer rates of 4mbps which I would expect from the class of the sd card, however today I am getting 400kbps max… I have no idea why it’s now so slow and have tried a restart. Any ideas?
Retropie 3.0
SanDisk 32gb micro sd class 4
Hey guys. Wondering if someone may be able to help me with a little problem I am having getting pikeyd to work with 2 buttons I have connected directly to the GPIO pins. For the life of me, I can’t figure out what I’m missing. It is likely something small and mundane, but here is what I have done so far… (The issue is in Step 6)
Hardware used:
– Raspberry Pi 2
– Mausberry Shutdown Circuit
– 2A 5V Power Supply
– SNES Controller Ports
– SNES Toggle Power Switch
– 2 x Momentary Push Buttons
– 2 x 1Kohm Resistors
– 2 x 10Kohm Resistors
– 32 GB SanDisk Ultra Micro SD1. Downloaded and flashed RetroPie version 3.1 for Raspberry Pi 2 to SD card.
2. Filesystem Expanded
– Started up RetroPie
– Exited with F4
– Ran raspi-config
– Expanded Filesystem
– Rebooted pi3. Updated pi
– Exited EmulationStation with F4
– sudo apt-get update
– sudo apt-get upgrade
– Rebooted pi4. Installed Muasberry Shutdown Circuit
– Exited EmulationStation with F4
– sudo wget http://files.mausberrycircuits.com/setup.sh
– sudo bash setup.sh
– Shutdown pi
– Connected Mausberry Shutdown Circuit to MicroUSB connector
– Connected In and Out headers on Mausberry Shutdown Circuit to GPIO pin 18 (GPIO24) and pin 16 (GPIO23)
– Connected SNES toggle power switch to Mausberry Shutdown Circuit board
– Powered on pi and tested Shutdown Circuit
– Works!5. Installed SNES Controller Ports
– Exited EmulationStation with F4
– sudo ./RetroPie-Setup/retropie_setup.sh
– Chose option 3 Setup / Configuration (to be used post install)
– Chose option 308 Gamecon & db9 drivers
– Enabled driver perminantly
– Shutdown pi
– Connected SNES Controller Ports
+5v to Pin 1 (3.3V)
Ground to Pin 6 (GND)
Controller 1 Data to Pin 5 (GPIO 3)
Controller 2 Data to Pin 7 (GPIO 4)
Clock to Pin 19 (GPIO 9)
Latch to Pin 23 (GPIO 11)
– Powered on pi and programed EmulationStarion with Controller 1 controlls and tested.
– Works!6. Connected 2 momentary push buttons for exit and reset
– Exited EmulationStation with F4
– git clone git://github.com/mmoller2k/pikeyd
– make -C pikeyd
– sudo cp pikeyd/pikeyd /usr/local/bin/
– sudo nano /etc/rc.local
– Added “/usr/local/bin/pikeyd -d” at end of file, one line before “exit 0” but one line after “/etc/switch.sh &” <– Mausberry Shutdown Circuit
– sudo cp pikeyd/pikeyd.conf /etc
– sudo nano /etc/pikeyd.conf
– Commented out all lines with # except for lines:
– KEY_R 18
– KEY_ESC 25
– Saved and exited pikeyd.conf
– sudo nano /etc/modules
– Checked to be sure uinput is on list of modules to start at boot.
– Shutdown pi
– Connected both momentary push buttons via the following diagram:

– Powered on pi and tested button presses
– Does not work :(When pressed, buttons should mimic keyboard presses R and ESC, but do nothing. I have checked all continuity and it seems to be fine. Switches close properly. Voltage at switches reads 2.7V and drops to 0.0V when depressed.
I am not sure what I have missed that would cause this not to work, any help would be appreciated.
Topic: SNES pi
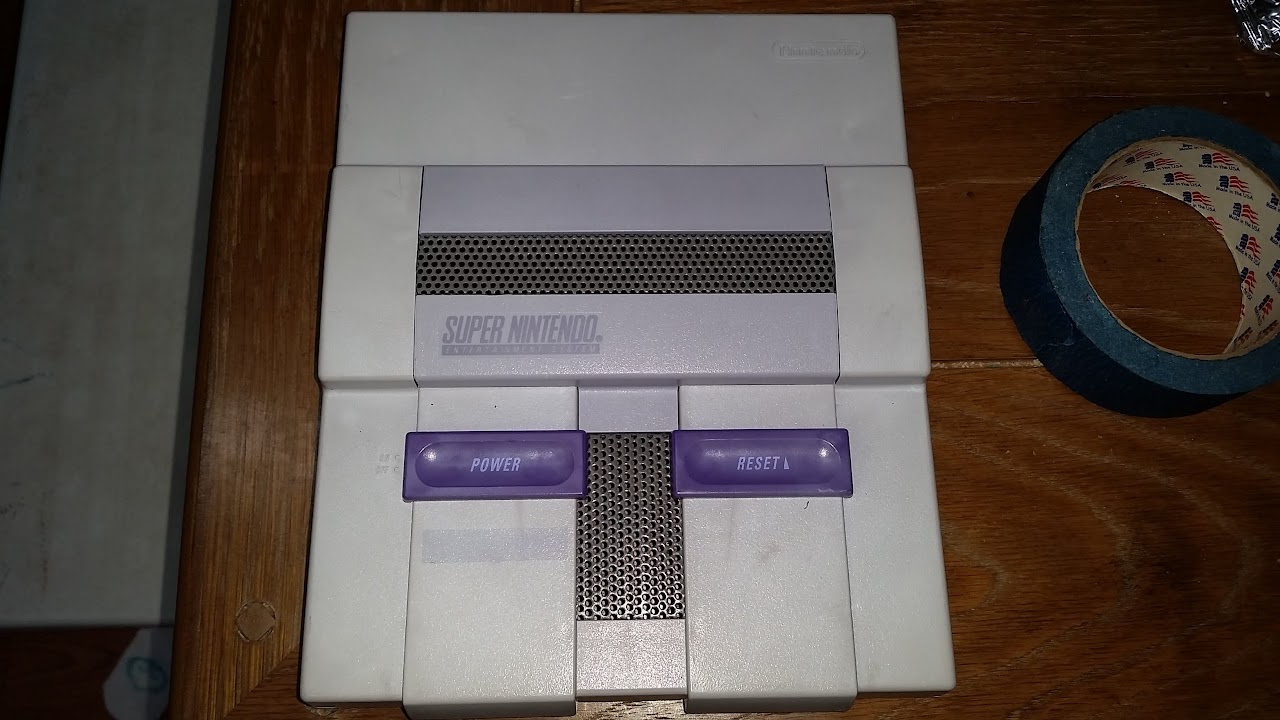
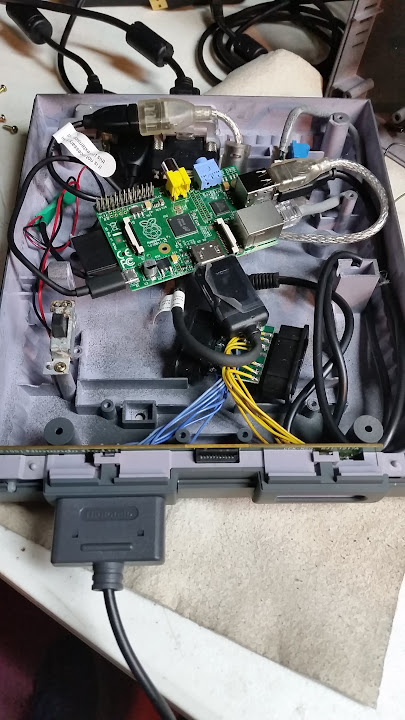
Here is my Pi-powered SNES.
I initially picked up a dead SNES for $10. the power jack was broken off of the motherboard, it was full of dead bugs and just nasty in general. It was also incredibly discolored. I managed to brighten it up with peroxide, but it was very unevenly colored
I wanted to minimize damage to the case, i did however modify the connector plate to accommodate the required connectors. HDMI, USb (for keybaord/mouse) and a standard USB type B jack for power.
at this point, i painted the shell with Charcoal colored Duplicor Vinyl and fabric coating.
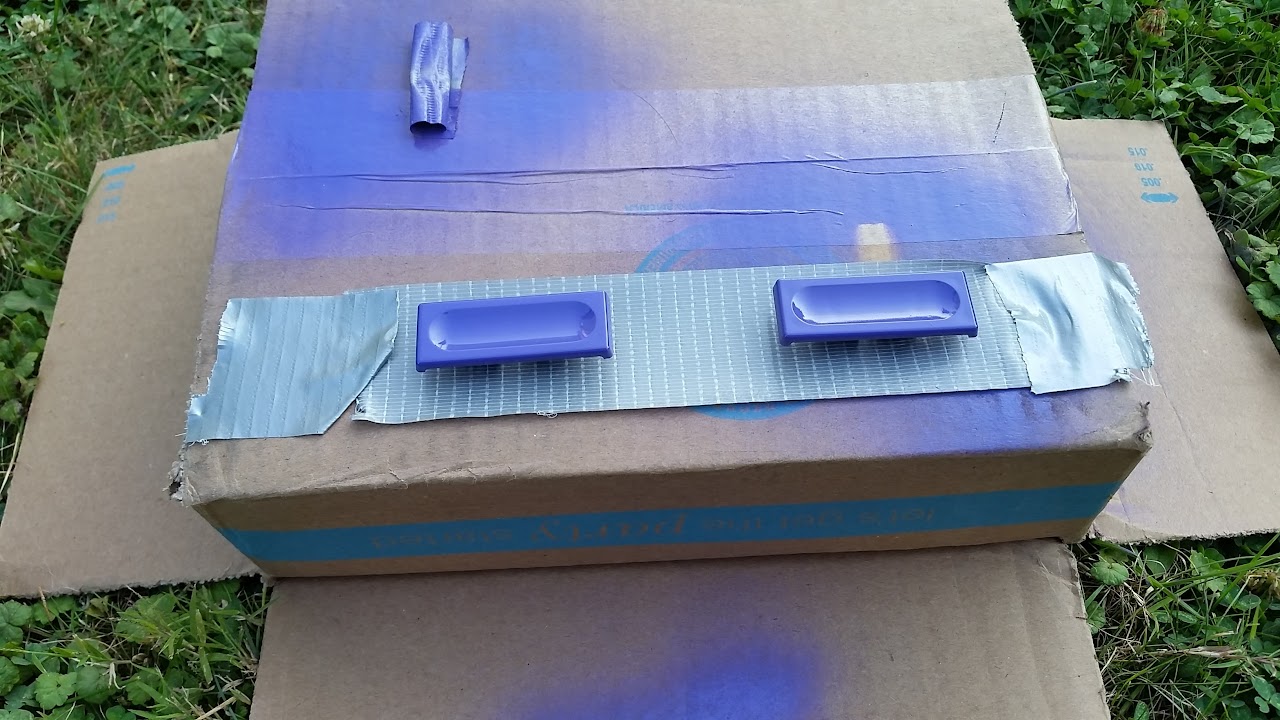
i found some Rustoleum gloss purple plastic spraypaint that very closely matched the original purple buttons, so i put a few coats on the buttons.
I cut some metal mesh from an old PC case and made panels to fill in the cartridge slot and eject button holes, since they are no longer needed. I painted them a medium gray, which very closely matches the original eject button color.
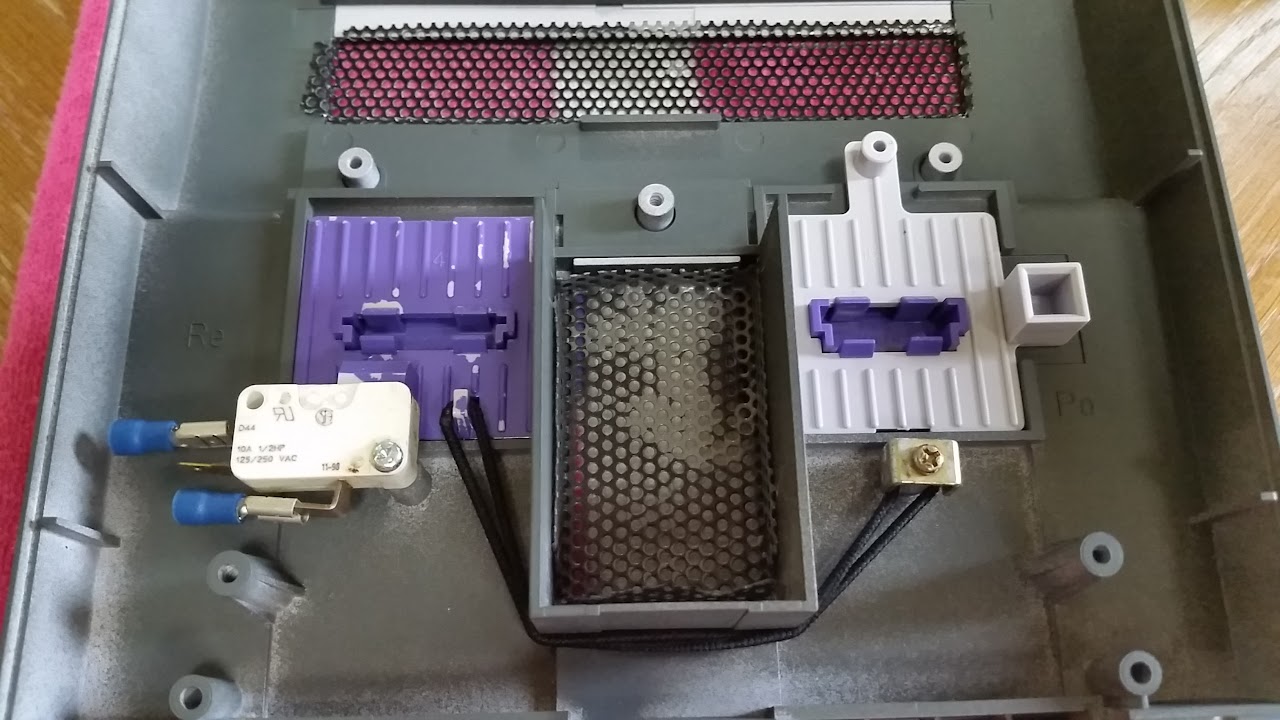
i wired up the original controller ports to a mayflash dual snes to usb adapter i picked up on amazon. Keeping the original PCB intact also allows the original LED to draw power from the controller adapter.
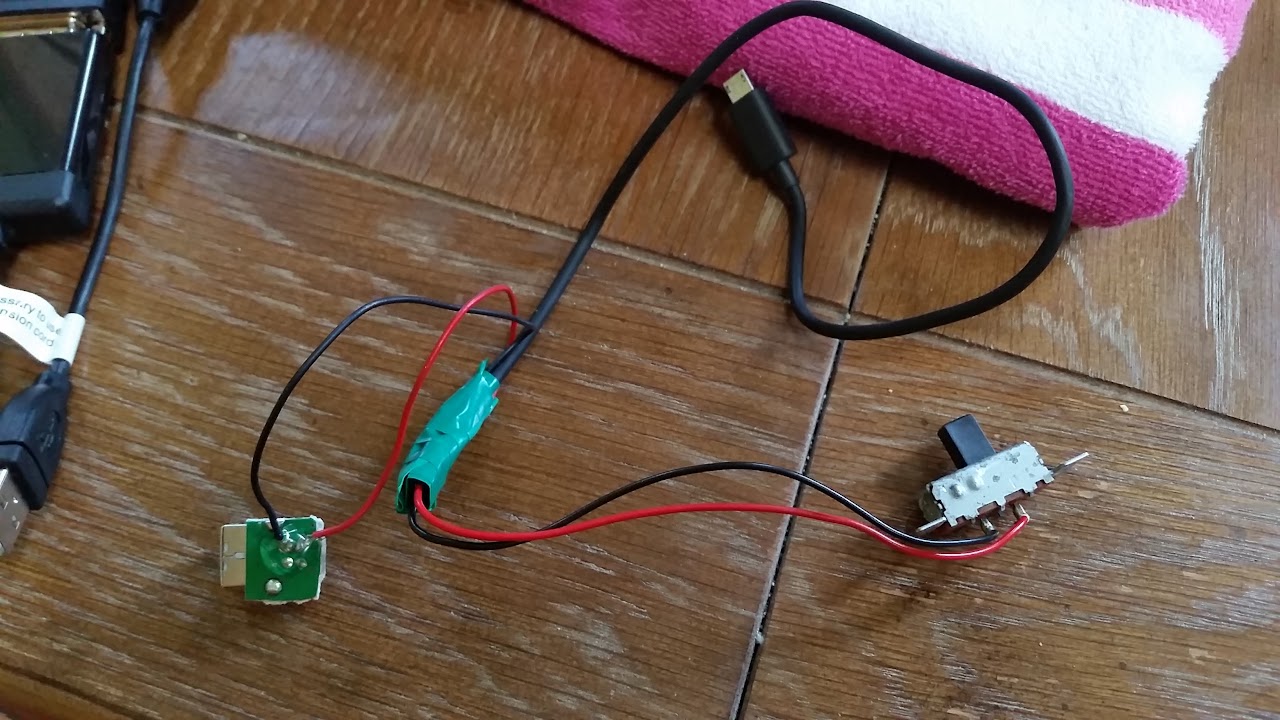
I reused the original SNES power switch, but the reset switch had to be modified. i simply screwed down an arcade style microswitch to one of the original screw posts. used an elestic hair tie to replace the spring i lost for the reset switch slider. in this position, the switch is normally closed, so i had to wire it accordingly.
for my power circuit, i didn’t want to use a flimsy micro usb connector, so i cut a usb type B connector from an old dead external hard drive enclosure and spliced it into a micro usb cable. the ground goes directly to the micro usb plug, the 5v line runs through the original snes switch.
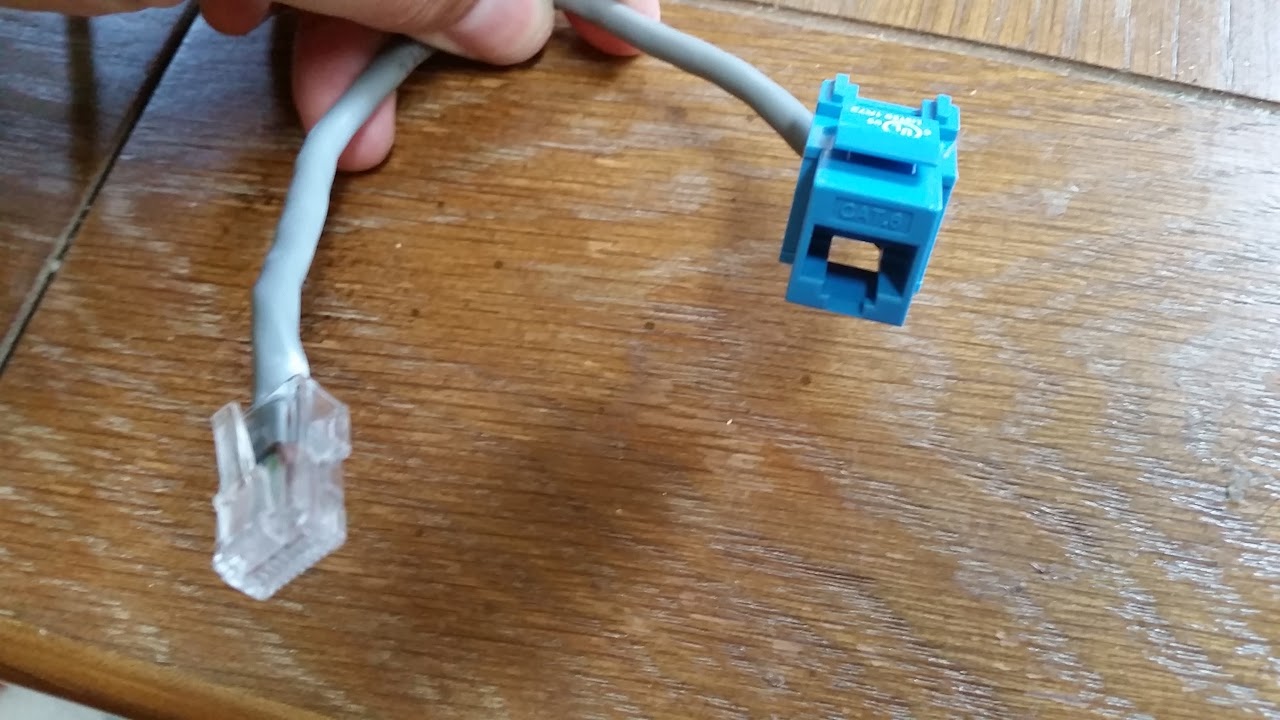
i also made a small ethernet extension so i could connect to the lan if i need to.
i had a ton of crap to fit inside this thing, i should have done it nicely, but it is just all shoved in there. there is a usb extension cable running to the back panel, as well as an HDMI extension. It is a mess, but it works.
the ethernet jack wouldn’t fit in the back panel, and since i shouldn’t need it much once everything is set up, i mounted it under the expansion door on the bottom. that way i can still access it without opening it up, and i didn’t have to make any new holes. it is just held in place with tons of hot glue.
here it is next to my unmodified snes.
the power switch cuts the power to the pi, so it has to be shutdown properly before turning it off. I have no problem doing this from the emulationstation menu, but to make it easier on my kids (and to give the reset switch a purpose) i have the reset switch wired to the gpio header, and a script running that triggers a shutdown command when the reset switch is pressed. that way when you are done, just press reset, wait for it to shut down, then power it off with the power switch. I know i could have bought one of those mausberry things, but this was cheap and it works fine for me.
Right now it is setup to play SNES, NES, turbografx and Genesis games. however my kids asked me to do a new project, so we are working on building a Pi powered Genesis next. eventually i’d like to do an NES and a playstation for dedicated action with the original controllers.
I hope you enjoyed.
Topic: Dual Audio Output
HI Everyone
I’m new to all this so this might be a bit of a silly question!
Is is possible to have audio sent through a USB adapter to a speaker, but also have the same audio going to HDMI?
I ask because I’m building a small cabinet with a built in screen and speaker but I also want to have the option of HDMI out (through a HDMI splitter) for when I want to play on a big screen TV.
Thanks!Topic: PS3 controlled…craziness
Hey all
Wonder if you can help (again!) I am trying to get an official Sony PS3 controller to install
Rasp Pi; Model 2b Retro Image 3.01
SO i followed Floobs video verbatim, and as usually the steps were simple and made sense, I looked for an update, ensured I had Bluetooth utils, installed the PS3 controller via the ‘set up’. The lights flashed then 1 came on (akin to it pairing with a device such as the Playstation)
However on entering Emulation Station no GamePad was detected. I did some snooping… Via hciConfig i found the USB “down” .. the js file appears to be EMPTY jstest jsO will not work and when i check the values in ps3controller/ sudo ./sixpair i get nothing like Foobs does on his video 7.15 here
It seems something has gone south, probably simple (I hope) when i do a lsUsb all are listed and the BlueTooth is brand new so should be compatible.
I include an image of the code in case anyone can advise or has solved similar.
Hello there everyone,
I’m sorry if this appears to be a hilariously basic question, but it seems so ridiculous that I haven’t seen anyone actually address it on the forums, faqs, or WIKI page.
I’m completely new to this entire Retropi project (and anything pertaining to a raspberry pi at all). My brother gifted me a Raspberry Pi 2 for my birthday, and I’ve been trying to transform it into a Retropi over the past 48 hours. No such luck.
I’ve gone through all of the walkthroughs and guides, and I’ve followed all of them to a T, step by step, and could not get the Pi to boot up after I wrote the disc image to the microSD card. So I started to watch videos of people doing this, to make sure I was reading the instructions correctly.
My work flow is as follows:
1) Insert 8gb MicroSD card into card reader on PC.
2) Using SD formatter, I format the card to wipe it clean.
3) I downloaded the compressed Retropi 3.1 disc image from the download page of this website. It’s a compressed “.gz” file when I finally have it downloaded.
4) I need to unpack this file, so I extract the files contained within the “.gz” file using 7-zip.
5) Now, the file is a “.img” file<HERE IS WHERE I THINK THINGS ARE WRONG, BUT I’LL GET BACK TO THAT AFTER I EXPLAIN>
6) Using Win32 Disc imager, I write this “.img” file to the formatted SD card.
7) Safely eject SD card
8) place SD card into the slot of the Raspberry Pi 2.
9) connect power supply.End result is that the raspberry Pi does not appear to start up. Two lights are on, one green, and one red, and neither of them are flashing.
Now. When I mentioned that “this is where I think things went wrong?” After watching all kinds of videos, whenever the guy extracts the disc image from the file he downloaded from this site, the disc image has an icon of a disc, with the filename “whateveritis.img”
When I extact the image file, the image file STILL looks like a winzip icon, and does not have the .”img” in its name. I only know it’s an image file because the properties of the file say that it is.
So I’m frustrated. I can’t even get the retroPi to boot, for what seems to be a complete non-issue for everyone else out there.
If it helps, my setup is as follows:
Raspberry Pi 2, Model B, 1GB
Kingston 8gb MicroSD cardThere is an HP USB Keyboard, a Mouse, and a USB SNES controller plugged into the Pi when I attempt to turn it on.
I should also mention that, to make sure my Pi wasn’t broken, I formatted a card and installed the proprietary Raspberry NOOB software to it. After placing the SD card in the Pi, the Pi booted up no problem and proceeded to install Raspbian.
This issue only happens when I format the card and then install the Retropi disc image.
So. Thoughts? Anyone? This issue seems so basic that it isn’t even included in any troubleshooting guides; it’s implied that when you extract the disc image from the file you download here on the website, that the disc image will be extracted correctly and will work.
Sorry if I’ve bugged you, or if there really is a place where I could have consulted to find the solution to this problem. I just can’t seem to find it.
Topic: My Arcade Project
Hey all, thought I would share my first arcade build with you. This forum has been alot of help to me over the last 3 months, so really wanted to share the final result.
I have built a standing 2 player full size arcade that obviously runs on RetroPie using a Raspberry Pi 2. It uses an Xin-Mo 2 player control board and for anyone having issues getting RetroPie to recognise it as 2 separate joypads has to check out this thread:
It’s a life saver.
As for the build itself, it currently stands at just over 2 metres tall. I know that sounds huge, and its definitely bigger than most standing arcades, but like everything I build it comes out like me: freaking tall. It has been custom wrapped in vinyl images of my choosing. I guess you could say it’s Metal Gear themed, but I has alot of my interests on it too like it’s Dragons Crown control panel.
For video out, im using an old CRT tv I got for free. Since this is retro, I wanted to keep it as classic as I could. Old school games look better on a good CRT tv anyway.
As for features:
[list]
[li]2 player set up[/li]
[li]Additional 2 players using custom built arcade control board, and PS3 controller. Totaling 4 players.[/li]
[li]300GB hard drive with about 100,000 roms (unsorted atm, clones, double ups etc.)[/li]
[li]USB expansion dock, allowing for more players and wifi dongle setup[/li]
[li]Arcade trackball (still to get working properly)[/li]
[li]Hidden draw containing keyboard for easy RetroPie control[/li]
[li]PS1 setup with up to 4 players[/li]
[li]Light gun setup for PS1 with up to 2 players[/li]
[li]Arcade is custom built so control board can be accessed from below at any time to fix buttons etc, and also has a door on the back to replace the TV should it ever die[/li]
[/list]The project took me about 3.5 months in total as I could only really work on it during weekends. I estimate the time to build and complete it all up to this point was about 150-200 hours.
You can read about the full build in detail here on my forum:
http://thevideogameforum.com/showthread.php?tid=390Here are some pictures of the build in action, up till its completed point now:
Frame:
[img]http://i.imgur.com/o1HZRhI.jpg[/img][img]http://i.imgur.com/B8zEAOn.jpg[/img]
Housing:
[img]http://i.imgur.com/YhZEihf.jpg?1[/img][img]http://i.imgur.com/QWdOaNy.jpg[/img]
[img]http://i.imgur.com/TGHSKqm.jpg[/img]
[img]http://i.imgur.com/KgYueS0.jpg[/img]
[img]http://i.imgur.com/txmRE2f.jpg[/img]
[img]http://i.imgur.com/2tWAFnX.jpg[/img]
[img]http://i.imgur.com/GUFo74N.jpg[/img]
[img]http://i.imgur.com/r1v3eBs.jpg[/img]
[img]http://i.imgur.com/47ACLgM.jpg[/img]
Control board:
[img]http://i.imgur.com/eB6vWXt.jpg[/img]
[img]http://i.imgur.com/9ZXqAuN.jpg[/img]
Paint job:
[img]http://i.imgur.com/HVYEbpH.jpg[/img]
Wrapping:
[img]http://i.imgur.com/V6lznIl.jpg[/img][img]http://i.imgur.com/dpJxm5U.jpg[/img]
[img]http://i.imgur.com/tuJFMLn.jpg[/img]
[img]http://i.imgur.com/zK78R8s.jpg[/img]
[img]http://i.imgur.com/AX8CNHo.jpg[/img]
[img]http://i.imgur.com/xo2qM41.jpg[/img]
Control setup:
[img]http://i.imgur.com/my8QWlr.jpg[/img]
[img]http://i.imgur.com/iTS8wdA.jpg[/img]
[img]http://i.imgur.com/nHkH1Ye.jpg[/img]
Inside and gun setup:
[img]http://i.imgur.com/lVBWGkC.jpg[/img]
[img]http://i.imgur.com/IzDAKHt.jpg[/img]
[img]http://i.imgur.com/jKbLKDR.jpg[/img]
Complete:
[img]http://i.imgur.com/EYRumiZ.jpg[/img]
I’m pretty proud of it, and it was so fun to build. We definitely do it again, thinking about making a bartop next time.
Any questions, just ask!
Hi,
I connected a SNES style usb gamepad.
Did a standard setup.
Controls work fine in SNES, NES, Masterstystem, Atari2600.But with videopac games none of the buttons and directions work.
In the game outlaw i can go left right down, but up and shooting go together.Help anyone?
edit: solved half of it, the dpad up and axis a where both -1…..strange.
One question remains: why do some videopac work and in some games none of the controls work??
First post so please be gentle.
The problem I have should be pretty simple but I can’t seem to figure it out or find a solution.
I have a Raspberry Pi B+ running RetroPie Image v2.3. I have it configured for multiple SNES USB controllers, the hotkeys are enabled and it all works quite lovely.
Now, I have an old SNES and I want to mount my Pi in there and make use of the old Reset and Power Buttons. I have all of the mechanical stuff sorted out (3D printing a front panel for the USB controllers and a the rear panel for power, HDMI and CatV and a straight wire in for the power switch). The Reset Button is going to be a momentary Normally Open switch but I don’t which pair of GPIO pins to use and know what lines of code to add to which config file. I would like the reset button to do what the START + SELECT combo already does; Exit the ROM back to the Emulation Station to select a different game.
Can you help at all? I’ve been down a google hole but I’ve had no joy. Thank you in advance.
My retroarch.cfg file is below and, like I say, works fine. Is this the file I would add to?
input_player1_joypad_index = 0
input_player1_b_btn = 2
input_player1_a_btn = 1
input_player1_y_btn = 3
input_player1_x_btn = 0
input_player1_l_btn = 4
input_player1_r_btn = 5
input_player1_start_btn = 9
input_player1_select_btn = 8
input_player1_l_y_plus = -1
input_player1_up_axis = -1
input_player1_l_y_minus = +1
input_player1_down_axis = +1
input_player1_l_x_minus = -0
input_player1_left_axis = -0
input_player1_l_x_plus = +0
input_player1_right_axis = +0
input_enable_hotkey_btn = 8
input_exit_emulator_btn = 9
input_enable_hotkey_btn = 8
input_save_state_btn = 4
input_enable_hotkey_btn = 8
input_load_state_btn = 5
input_player2_joypad_index = 1
input_player2_b_btn = 2
input_player2_a_btn = 1
input_player2_y_btn = 3
input_player2_x_btn = 0
input_player2_l_btn = 4
input_player2_r_btn = 5
input_player2_start_btn = 9
input_player2_select_btn = 8
input_player2_l_y_plus = -1
input_player2_up_axis = -1
input_player2_l_y_minus = +1
input_player2_down_axis = +1
input_player2_l_x_minus = -0
input_player2_left_axis = -0
input_player2_l_x_plus = +0
input_player2_right_axis = +0
input_enable_hotkey_btn = 8
input_exit_emulator_btn = 9
input_enable_hotkey_btn = 8
input_save_state_btn = 4
input_enable_hotkey_btn = 8
input_load_state_btn = 5I’ve been working on a Retropie Arcade cabinet, and I’d been having some trouble with getting the buttons to work. I later learned that the GPIO board wasn’t able to be used with retropie, so I bought this (http://www.amazon.com/gp/product/B00UUROWWK?keywords=usb%20encoder&qid=1445207699&ref_=sr_1_1&sr=8-1) USB encoder in hopes of getting the controls to work.
The only problem is, I don’t know how to set it up. It’s acknowledged as a gamepad, but I have absolutely no idea about how to set up individual controls, let alone something like a joystick.
Hi! This is the last step I need to make my retropie system (Rpi 2 with retropie 3.1 in SD image) work properly. I’m currently trying to use a twin USB controller (that means two ps1 dualshocks connected into a single USB adapter). At emulation station everything works fine and I can configure the pads. However, every emulator I run displays the message “twin USB joystick not configured” at the bottom of the screen in yellow while booting, and then the games don’t respond to them. How can I solve this?


