You already might have heard of the Raspberry Pi. It is a credit-card sized PC from the Raspberry Pi Foundation and is going into mass production and distribution these days. There is a huge demand for “the Pi” and the first orders are limited to one per person. A few weeks ago I got my Pi delivered and started working on what I would describe as “universal console”. In this post I describe my initial thoughts about this project and present an adapter that allows you to use SNES controllers as input devices for the Raspberry Pi.
UPDATE: The ControlBlock is now available and provides an easy and safe way for connecting NES, SNES, and Arcade controllers to the RPi and it also provides a power switch functionality!
Being part of the 80ies generation I belong to the group of people that grew up with a whole bunch of 8- and 16-bit video consoles. Nowadays, you can find emulators for all kinds of these consoles and some time ago I got the idea that it would be nice to have a tiny PC that could just be switched on to play this or that good old game. When I read about the Raspberry I finally decided to start this project.
There are several things that have to be done for this:
- Decide for a stable working Linux distribution that provides access to the video and sound hardware.
- Make the emulator(s) work.
- Build a launch menu that allows for selecting the console and or the video game.
- Build a hardware controller interface that allows you to connect real video game controllers.
- Build a case that contains the Raspberry and the connector(s) for the controller(s).
I know that you are now saying “Each of these five points is a project on its own.” and I agree! Let’s have a brief look at each of these points now:
The distribution The decision for a “good” distribution is tricky and I am not sure which of the available ones is best suited. Since the Debian distro will be the official distribution of the Raspberry, I think that this might be the best choice. But, currently, even the Debian distro provides an ALSA module only in alpha stage. This produces horrible audio outputs and leads us to the second point:
The emulators There is already work going on for tht point and ToadKing is doing fantastic work here. He is adapting the RetroArch emulator to the Raspberry currently and provides a public Github repository. There is also a thread about this work in the official forum. This is a central piece of this “universal console” and I really hope that the Raspberry port of RetroArch and of the emulator cores will be further developed.
The launch menu Maybe there already exists a launcher that can be compiled on the Raspberry. If you know such a thing, please tell me! Otherwise, I thought of a rudimentary (Python?) script that could be used for the beginning. Update: In the meantime, the front end “Emulation Station” has started to be developed. A lot of ideas are still being discussed and on the to-do list, but there is already a running version of it. A follow-up article presents the RetroPie setup script that automates the installation of emulators and front end.
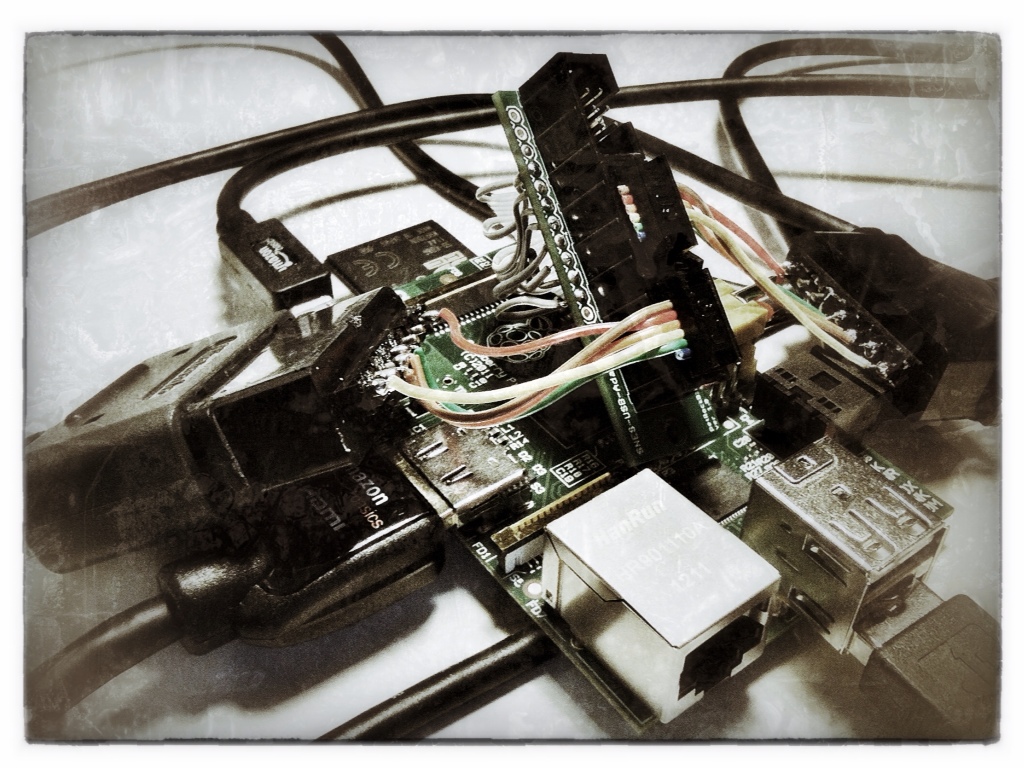
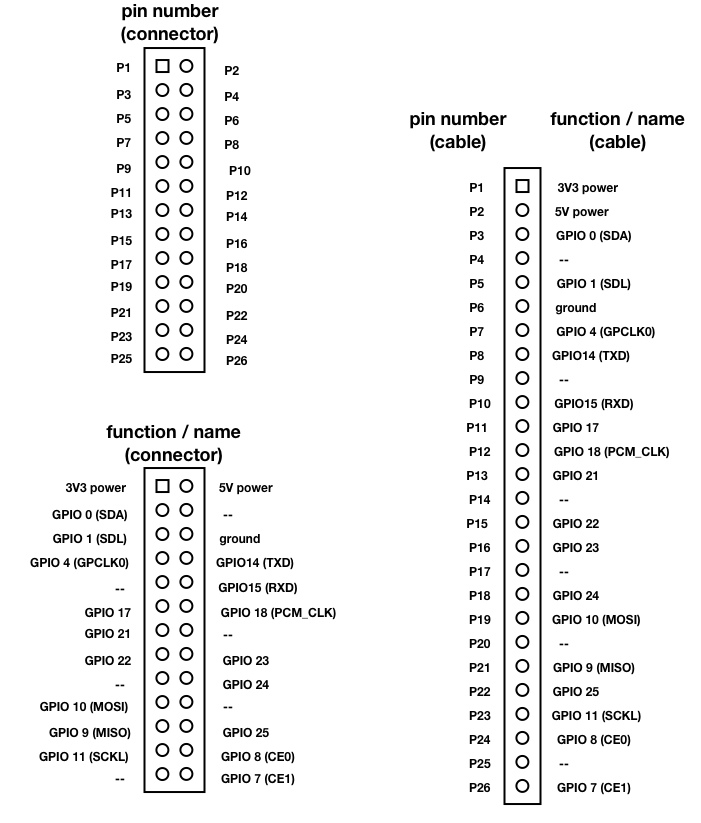
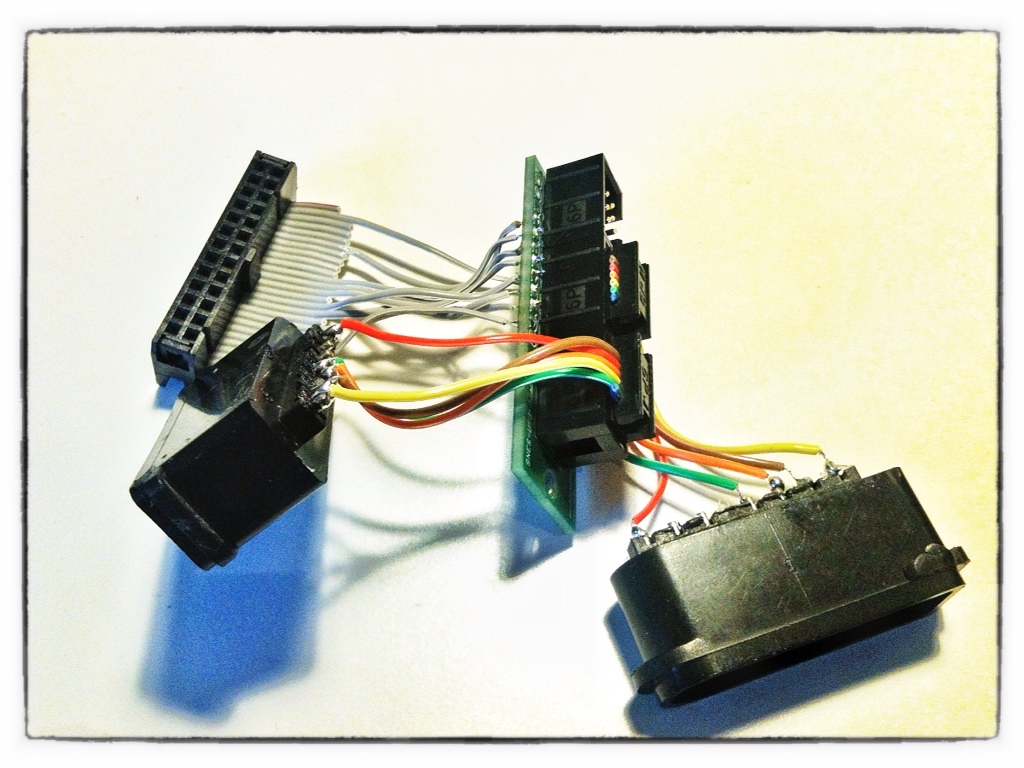
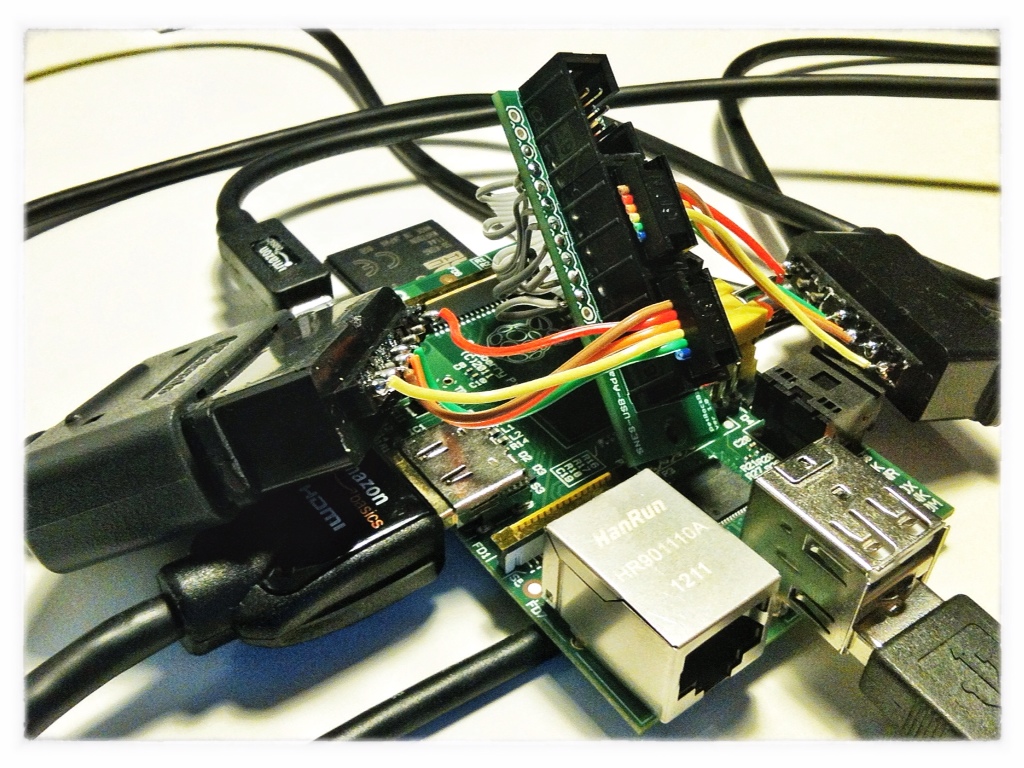
The controller interface I think that an authentic retro-gaming device needs authentic input hardware. The Raspberry comes with two USB ports and one possibility would be to use some remakes of, for example, SNES controllers with USB connectors. In order to use original controllers, however, one needs to come up with an interface for these controllers. This is where the second part of this post comes into play: I built an adapter board that allows you to connect two SNES connectors to the GPIO pins of the Raspberry. I got the SNES connectors from two controller extension cables. This wiki article gives some more details about the GPIO pins of the Rasperry. A short C program reads the states of the two controllers and passes all button presses to a virtual keyboard that is implemented with the help of the uinput module. In the following, I explain some more details of this adapter, show some pictures of it, and, at the end, also a video demo.
Let us first talk about the hardware part. The idea of designing a PCB that could be used for connecting SNES controllers to a microcontroller or PC came up when I read about a project, in which an NES controller was connected to an iPad. In previous posts, I wrote about the first prototype, the SNES-adapter PCB, and a case for the adapter. For the connection to the Raspberry I used the following parts:
- 1x SNES-adapter PCB
- 2x SNES connectors (obtained from extension cables)
- 2x Shrouded Pin Header, 2×3 pins
- 2x Ribbon Crimp Connector, 2×3 pins
- Ribbon Cable – 6 wire
- 1x Ribbon Crimp Connector, 2×13 pins
- Ribbon Cable – 26 wire
The SNES-adapter board really does nothing but to provide a clean wiring for the connectors. You could also connect a SNES connector with the 26-wire ribbon cable directly. Besides the cleaner look, the nice thing of the adapter board is that it provides the possibility to connect two controllers without the need for manually splitting the 5V line. If you are interested in the adapter board, send me a mail, I would be happy to share this! To get the SNES connectors I ordered two SNES extension cables and just used the female connectors of them. The SNES and ribbon crimp connectors are wired as following:
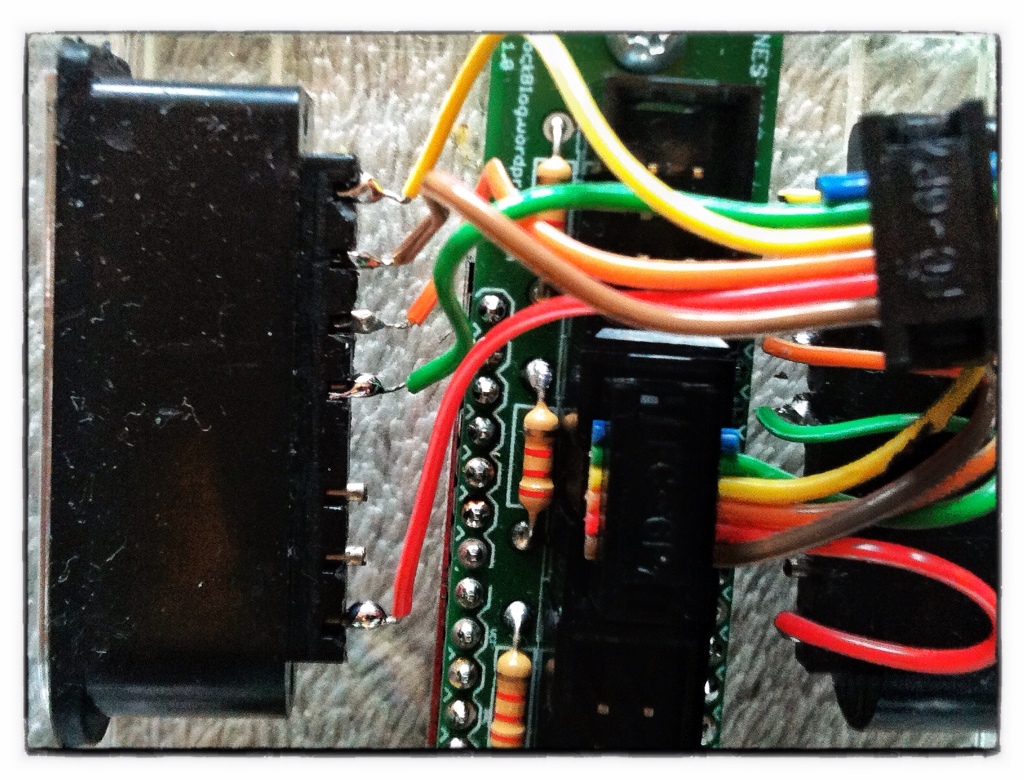
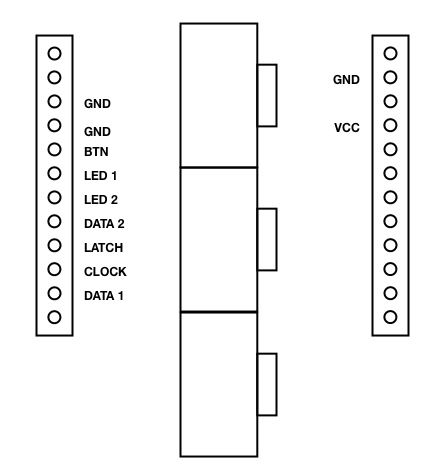
You can also see some resistors in the picture – these are actually for LEDs and a button and are not used here. A more detailed description for the assembly is given here. This is a diagram of the pinout of the adapter board:
The GPIO pinout of the Raspberry and of the corresponding 26-wire ribbon cable are shown here:
- GND to P6
- VCC to P2
- DATA 2 to P15
- LATCH to P16
- CLOCK to P18
- DATA 1 to P22
Having finished the hardware part I started with the software implementation. I decided for a C program to have the possibility to keep the CPU load as low as possible. Basically, the program has to do two things: First, it has to read the state of each button. A very good source for information about the NES/SNES controllers is also the documentation of the Uzebox. Second, it has to pass button events to a virtual keyboard. The uinput kernel module can handle the input subsystem from within the user space. I stumbled across a very informative article about the uinput kernel module. It is a two-parts article with part 1 here and part 2 here. The uinput module has to be manually loaded with this command:
[gist id=3051580]To access the GPIO pins from within a C program you need to download and install the Broadcom BCM 2835 library. These commands download and install this library:
[gist id=3051568]I called the program SNESDev and created a Github repository for it. You can find it at https://github.com/petrockblog/SNESDev-RPi. Here is a demo of everything working together for a quick game of a famous kart game:
This leads us to the end of this post. So far, I did not speak about a case yet. Having some experience with other laser-cut cases I already started to design a case for the Raspberry that also contains ports for two SNES connectors. When this is finished I will write about it in another post. UPDATE: You can now find a shell script in my Github repository that automatically installs all needed packages for RetroArch and various emulator cores, as well as SNESDev.
Certainly, I left out some information that you would be interested in. So, if you have any questions, comments, or questions, just send me a mail or write some comments below – I would be happy about any contributions!
Some obligatory legal stuff: The Raspberry Pi is a trademark of the Raspberry Pi foundation.
You might be interested in the ControlBlock – it is shipped world-wide. But it is not for free, though.
SNESDev was developed for the GPIO Adapter, which is not further developed, sorry.
Hi, im trying to build a retropie inside a snes, using SNESdev-RPI or gamecon_gpio_rpi. Well, the first one (I think that one you had developed) installs correctly, runns as well but it aparently needs the PCB adapter, and I’m in Brasil (unfortunately), so I can’t buy the adapter. The second – gamecon_gpio_rpi – gives errors on installing, aparently something with the new raspbian kernel 4.4.11 v7, and simply doesn’t install, when i try to configure the map it says ‘module gamecon_gpio_rpi not foud’…. It in case of installing via terminal, because the nevest retropie setup script don’t has the gamecon neither the snesdev modules, and the old scripts gives errors installing like via terminal. Also your’s script .sh on github (didn’t found the link righ right now) dont work, gives errors like ‘unexpected “(” ‘ and something like. Can you give-me some light?
SNESDev is supposed to work with NES controllers: You can configure SNESDev with the configuration file /etc/snesdev.cfg
I hope this helps!?
Hi,
I just assembled the adapter and connected a NES controller. It is not working.
I took a look at the SNESDEV code. Actually there is a differentiation between NES and SNES controllers that is never used because you can not setup that you are using a NES controller. Is that correct?
In line 175 of SNESDev.c it says: if (strcmp(confres.gamepad1_type,”nes”)==0) {
gpads[0].type = GPAD_TYPE_NES;
Which is never true.
So is the script supposed to work with NES controller or not?
regards,
Chris
Currently, there is no N64 emulator available for the RPi (at least I do not know of it).
does that Pi have any capability of running n64 emulators? Love your project, just want to possibly make my own that is n64 oriented.
To reset print in terminal (ALT + F4 if u are in the emulator)
cd .emulationstation
sudo rm es_input.cfg
So am I able to hard wire two snes controllers to the GPIO pins such that both controllers clocks go to ping18, along with the rest of the pin out?
Is there any way to reset the controller settings? I connected a USB NES controller, and it did not setup the controller correctly so I cannot use it.
Is there any way to reset
There is a GPIO joystick driver kernel module that supports up to six mix and match controllers, all sorts. See raspberry pi forums. Another cheap option is atmega OVR usb adapter, see raphnet.de the chips are ~$1.50 and you only need a handful of components. Diode, resistors, crystal
There are some games that could be played with more than 2 players. Is it possible to build a 4-controller interface (much like the snes multitap) for RaspberryPi with this? I hope so, because I plan on building a 4 player arcade cabinet and the raspberryPi together with your adapter-pgb would make it cost a lot less money.
Thanks a lot!
Thanks a lot for spending some time in order to compose “SNESDev-RPi: A SNES-Adapter for the Raspberry Pi | petRockBlog”.
Thank you for a second time ,Delores
would I run into any problems using 2 usb controllers(like the generic ones for playing games on your pc)
Be prepared for a steep learning curve if you decide for the Linux approach. It is worth every second though.
Any joy with this dude? I’m currently deciding between a windows-based mini-HTPC with XBMC running ZSNES (which I’ve got running perfectly on my windows laptop) or a RPi running RaspBMC, but have no experience with linux etc so no idea what emulator I’d use!
Have you connected one or two controller(s)? If one, which pin out are you using?
I have seen your request in the issues section of the Github repository – I will have a look at this tomorrow.
You can connect to the Pi via ssh and disable the autostart n boot via the RetroPie script again. You could also do this manually via “sudo service SNESDev stop”.
Hi Florian, when i connect the Snes controller to Pi i get an unlimited serie de characters in the command line, It stops if i disconnect the controller. I installed your Snesdv trough the RetroPie-Setup script, and all connections to GPIO ports seems be ok.
Any ideas? How can i reconfigure or reinstall Snesdv cfg?
For those looking this is how you add uinput to startup
SSH in to your Pi as root
cd /etc
sudo nano modules
add the text “uinput” then press “ctrl+x” and “y” then “enter” to save changes
sudo reboot
Thanks!
I have no experience with RaspBMC, but by looking at the wiki of RaspBMC at http://www.raspbmc.com/wiki/user/root-access/ I think that you could simply run the script with one of the described methods.
If you manage to successfully use the RetroPie script with RaspBMC it would be great to post it here!
Very Nice, Just what many people are after.
One question I have is. It doesn’t look like you’d be able to get this to run in Rasbmc because you need root access to install dependencies?
Many Thanks Rob.
thx for your help, I was foolish enough to plug in the ATA cable the wrong way…
It seems that the polling of the controller via the GPIO pins is not working properly. Have you connected the controllers according to the article at http://petrockblog.wordpress.com/2012/07/19/connecting-snes-sockets-to-the-raspberry-pi-an-assembly-guide/?
Hey Florian, everytime I try to start SNESDev I get an Error:
szsaq
-bash: xzsaqw: command not found
$ ERTYUIOPCBFV
first I thought, I have to reconfigure the keyboard layout back to standard to fix this problem, but the error still exists. Have you any idea?
Hey Florian, I am soooo close to get everything working perfectly. You got no idea how much I appreciate your work. Keep up this kind of stuff.
Right now I got one thing. Your script got the option to put emulationstation into autostart. Is there a possibility to automatically start SNESDev aswell? (I mean “~/RetroPie/SNESDev-Rpi/bin/SNESDev &”) because just putting emulationstation into autostart does not make my controllers work ;)
Hi Chad,
Good to hear that you finally got it working!
Sorry for the not-so-clear description of the one-controller assembly guide. I have added two more sentences to the description and hope that it became clearer now.
Your Moldy Pi Plate really looks interesting and motivates further tinkering for this project :-) Thank you very much for your offer to send me a board! Since I know the prices of small scale PCB manufacturing I really appreciate your offer. I could send you a Petrockblock Pie case in exchange – if you are interested?
I would suggest to send me a mail via the “contact” site for everything else.
Hello,
Yes I am sorry I have been on vacation away from my Raspberry Pi. I figured out two things of importance I was doing wrong. I had one controller soldered to the Raspberry Pi and found out that the diagram for your one controller setup isn’t quite right. The Pins should all be the same but instead of Data 2, connect to Data 1 on the one controller setup. This made my controller work instantly and made me feel quite dumb that I was doing everything right but couldn’t figure out what I was doing wrong. Also, I was running emulationstation in X. Once I ran emulationstation at boot and used your advice to initialize the controller before running emulationstaion, everything worked flawlessly!
Thank you very much for your time and help and such a great product! For your Time and effort can I send you my new Moldy Pi Plate http://www.moldypi.blogspot.com, a creation for myself but based upon your creation of this SNES to GPIO on the raspberry Pi. I can send you the board for free for helping me.
Thank you again,
Chad
That would be the lightweight retro-gaming solution then ;-)
The thread at http://www.raspberrypi.org/phpBB3/viewtopic.php?p=149922#p149922 might be of interest for you.
I was thinking of just running Linux with an emulator installed with 2 USB NES controllers in the ports
Did you make any progress?
Ok, so you are using SNESDev. This means that a virtual keyboard is emulated and not a game pad, which, in turn, means that we do not need “jstest”. If you are seeing the output in hte terminal when pressing a button on the controller the hardware part is working!
>> Do I run the & program in one window then open another terminal to type in emulationstation?
No, if you start SNESDev with & at the end, you can just press ENTER a second time when the program started and you should get back your cursor.
BTW: You must not run X, when using EmulationStation!
Since the D-pad of the controller is mapped to the arrow keys of the keyboard you should be able to move the cursor with the keypad. If not, you are maybe holding the second controller in your hands.
Try to start a ROM without EmulatoinStation first. You can run a SNES rom by calling “retroarch -L /home/pi/RetroPie/emulatorcores/pocketsnes-libretro/libretro.so /home/pi/RetroPie/roms/snes/nameofyourrom.smc”.
Press some buttons and compare the output in the terminal with the keyboard input configuration in /etc/retroarch.cfg.
Really, as long as you see button presses as output on the terminal it is “just” a matter of software configuration now …
Hello,
Everything works as you mentioned but the command jstest /dev/input/js0 just returns invalid directory. The command jstest alone works so I know its installed. Do I run the & program in one window then open another terminal to type in emulationstation? When I type sudo ~/RetroPie/SNESDev-Rpi/bin/SNESDev & I just get initializing Pad and then I can push buttons on my controller and it shows up in the terminal but what do I do from here? Emulationstation is finally seeing my roms and I can start one but no controller still?
Hi Chad! Are you using SNESDev (https://github.com/petrockblog/SNESDev-RPi) or the GPIO kernel module that can also be installed by the RetroPie setup script?
If you use SNESDev, you have to start it with “~/RetroPie/SNESDev-Rpi/bin/SNESDev &”. Eventually, you have to make the binary executable before (with chmod +x ~/RetroPie/SNESDev-Rpi/bin/SNESDev). The ampersand starts the program in the background and you can start an emulator afterwards. When everything is set up correctly, pressing a button should lead to simulated key presses in the command shell.
The GPIO kernel module can be tested with the command “jstest /dev/input/js0” or “jstest /dev/input/js1”
I hope this helps!?
I cannot get my snes games to run. I have checked everything and followed this all to a T! How do you actually run the games? Do you just type emulationstation? This only brings up Atari 2600 the list is empty!
I have two snes roms in my roms snes folder and all lowercase .smc files. I have everything connected correctly but I can start a game but my controller is not working. I have everything soldered correctly. What are the exact steps to actually run a game with a snes controller on the GPIO pins. Can you write a description of this. I have searched all over the blog and for some reason I just cannot figure it out!
Thank you,
Chad
Until now, I did not have any issues with the 3.3V supply even in a 2-controller setup.
Actually, In my first setup I accidentally connected the controllers to the 5V pin. The SNESDev post shows this setup. Everything worked fine and (at least I think so) the RPi did not take any damage in this very special setup. However, as pointed out at http://elinux.org/RPi_Low-level_peripherals there is no over-voltage protection for the GPIO pins, so I changed my setup to use the 3.3V pin to avoid the risk of future damage.
or are you seeing any problems on the RPi from sending it 5V signals?
With the RPi being 5V intolerant, many projects have had difficulty addressing the 3.3V to 5V problem. Have you had any issues with your setup being ”underpowered”, especially in 2-controller setups?
I used the connectors from SNES extension cables for controllers. More specifically, I used the ones from these cables: http://www.amazon.de/gp/product/B004ZG5SAW/ref=as_li_ss_tl?ie=UTF8&camp=1638&creative=19454&creativeASIN=B004ZG5SAW&linkCode=as2&tag=petrfunstuffo-21
Great Work! i have been searching all over the web and your the guy in the center of the Pi emulation. Quick question i look at amazon for the snes extension cables, but there are so many I don’t want to get the wrong ones. The plan is to set it up with the case you designed, so I want the cut outs to match you think you can point me in the right direction?
In reference to your launcher project, there definitely is – Adavanced Launcher, which is a plugin for XBMC that is specifcally designed to launch emulators to extend your media center to include games. I see this as a fantastic way to integrate your great work for the raspberry pi because raspbmc is debian based that exists solely to launch XBMC and run on the rpi. My goal is to get your work working on raspbmc and launch the emulators through Advanced Launcher.
That is a nice idea!
I might have the corresponding case for your raspberry. :-)
http://edv-huber.com/index.php/problemloesungen/12-pitendo
Excellent :) Thanks Florian. I’ll give it a shot when my joystick arrives :)
Yes, the USB-controller should be recognized as a joystick/game pad on the Raspberry. Maybe you need to enable the joydev module and export SDL_NOMOUSE=1 to make RetroArch work with it.
Just a quick question guys… So if I got one of the modern USB copies of a snes controller (we had a megadrive II in our house :P) Will it still work okay with the emulator? I’m not actually a coder just a bit of a geek :D Thanks :)
I am afraid I have no experience with the combination of XBMC and RetroArch.
For the hardware part of the NES connectors you might want to have a look at http://uzebox.org/files/NES-controller-Hydra-Ch6All-v1.0.pdf. There you will see that the SNES and NES connectors vary only in their shape and not in their pin out. Also the polling protocol is very similar. I have not tried it yet, but SNESDev might already poll NES controllers without many modifications.
Awesome work! Thanks for the script! I’m going to try it out later. I have a question though, I’m putting my Pi into an NES and using Raspbmc for my media duties, as well as rom management for emulators. Will retroarch work with XBMC? Also, I’m looking at the work you did for the controllers, what would I need to do to replicate that using the NES controller ports?
Yes, you are right with the background process!
I updated the README.md in the repository and added information about installation and running SNESDev.
This might sound like a daft question but i’m assuming I just run SNESDev as a background process? I’m fully confident RetroArch is fine and is getting the correct config file.
Did you manage to solve the problem? One solution for this would be to adapt the key map from RetroArch. When I wrote the SNESDev I had the buttons from the first controller mapped to the number keys 1 to 8, but the current version in Github has the same mapping as RetroArch expects it to be for the first controller …
Yes I’am. For example I press start on the pad it throws out number 8 which is the 8th command on the button list form the code. Everything works fine for second controller data.
Are you using the SNESDev code from my Github repository (https://github.com/petrockblog/SNESDev-RPi)?
For some reason my Controller 1 buttons are throwing out numbers from 1-8 except for the D-pad which is correct
I’m also working on a launcher-script for the emus… As a bash-script with the dialog-utility. I thinks I’ll be ready within the next few days :)
Thank you!
I am also using a similar self-written script for automatically setting up everything automatically for a freshly installed distro. If I feel that it is mature enough I will put it into my Git repository.
UPDATE: You can find the Github repository with the “auto-installer” script at https://github.com/retropie/RetroPie-Setup. See also my (short) post about this script.
The app launcher in Python is a great idea! Seems as if we both are following the same approach: I also did already some tests with Python, XML, and PyGame for a front end. Especially PyGame could be used for a simple graphical front end, I think.
Hi everyone, just to let you know I have created a automated script for the installation process, also a python console application (works, but need further dev) to help you find and run your roms. Check it out at
http://www.frost-software.com/blog/2012/7/20/super-nintendo-for-the-raspberry-pi.htmlhttp://www.frost-software.com/blog/2012/7/20/super-nintendo-for-the-raspberry-pi.html
Cool idea with the SNES case!
The emulator is running directly from the console without X. I am not sure if any kind of hardware acceleration is used right now – ToadKing could probably tell you more about this.
Wow, that’s a nice project! You might consider using an old SNES as a casing, since it already has the two controller ports and it looks awesome.
I was wondering if the emulator you use is run on top of an X-server? Or are you using a hardware accelerated framebuffer?
Hi Shawn,
this would also work for NES controllers. From what I read so far, the code from my Github repository should work out of the box. The BES and SNES controllers have (nearly) the same polling protocol.
Would this work for NES controllers too? If not what modifications would need to be done? I am currently planning on making a case for my Raspberry Pi from an NES, so I would like to be able to use NES controllers with it using the original connectors.
Shawn
Hi Miles,
thank you! I like the idea with the Gameboy – do you plan to use the Gameboy as a case only or do you even plan to attach an LCD display to the RPi? Take care for the voltages – it just happened that the SNES controllers can be polled with the voltages provided by the RPi.
I will continue the work on the SNESDev-RPi code in the next days and include a gamepad functionality.
Hope to hear more from your Gameboy project!
This is amazing, I am looking at modifying it for a Raspberry Pi installed in a Gameboy, I need the GPIO pins tied to individual buttons, there are only 8 buttons. I thought of using a NES controller IC I have here, but I would prefer to just wire the buttons to the GPIO pins.
I assume that if I edit the code I can get it to accept 1 pin as one input instead of reading a serial chip.
Looking forward to any plans to emulate a standard USB gamepad for compatibility with a wide range of programs.
I’m trying to buy a new game for my hubby… what game would you suggest? He likes action games.
There is already an answer as the reason for the slowness here. just as addition to that: I am using the Pocketsnes-libretro port right now.
Actually, I am not that deep within the RetroArch architecture. Without looking at the source code I would have a guess, but I do not want to say something wrong here. I assume that ToadKing could tell you a lot more about this.
Thanks a lot for this encouragement! There is still a lot to do before something like “a product” would be reached here. However, I plan to continue the work on this and any progress will be posted in this blog. So, I recommend to subscribe to the RSS feed ;-)
Is this something you plan on building and selling once it’s complete? I’m a classic games collector and player, and I agree there’s nothing quite like playing with a real controller on a television in a living room. Problem is, I have so many consoles and games that having them all hooked up at once is a huge mess of cables and a real fire hazard.
I’ve bought a handheld device called a Dingoo which can output to a TV, but the emulation isn’t always perfect, and you can’t use real controllers. Having a single console, not having to dig through my bins of games, and only swapping out controllers is something I would be willing to pay real money for, and I doubt I’m alone.
Do you have a website or something where I can follow your progress and make a purchase in the future?
Very cool, is the emulator running on KMS/framebuffer directly, or is it using X or Wayland?
Really nice work, congrats.
or http://www.play-asia.com/paOS-13-71-6m-49-en-70-3emk.html
Reblogged this on zacharias and commented:
Major geekness everyone simply MUST love!
Check out http://www.retrousb.com/index.php?cPath=21 Not only do they provide ready to go cables they also sell a kit you can use inside a real SNES case.
Hi. Congratulations for the nice work. You could also try testing MESS. MESS is a sister-MAME project which attempts to emulate several old computers, consoles and videogames that ever existed. It shares a lot of code with MAME, which it is gets its basis from, it is command line driven, good for integrating into frontends and works in Linux. http://www.mess.org/
Kirby’s Dreamland 3 goes into pseudo-hi res mode at specific levels (Level 1-2 for instance) – that on-top of an additional 10Mhz co-processor to emulate (Kirby’s Dreamland 3 using the SA-1 co-processor). This is processor-intensive.
Amazing work! Looking forward to seeing this project take form! =)
Great work!
But I have one question. You wrote you use RetroArch. Do you use the Pocketsnes-libretro Port or the snes9x-Port? MarioKart works well on my Rpi, but Kirby’s Dreamland 3 runs slowly as hell ;)
So I’m working on the exactly same thing, an ultimate retro-console-thing :)
The software would have to be adapted to the protocol of the Sega Genesis controller. I do not plan to do this, but you could add this functionality to SNESDev :-)
You are right – the power slide needs to be trained ;-)
Yes, this might also work, thanks for your suggestion! But I like the all-in-one solution more – it needs some hardware work though.
Thanks for the link!
I think that I prefer the approach. with the original connector for the “more intense” retro feeling . But using a USB game pad IS an alternative
Cool! Would it work for a Sega Genesis gamepad?
BTW, Buffalo already has USB versions of NES and SNES gamepads (search for buffalo classic gamepad in amazon.co.jp).
Screw the technical stuff…he needs to learn how to Power Slide!
Hold the button on the top of the controller, the right button if turning left and the left button if turning right, to execute a controlled slide. It takes some practice, but it’s the most important move to master in Mario Kart!
Hello, my brother and I are currently making snes ports with the gpio ports, nes power on / off and reset buttons as well as a GUI launcher for any emulator in Qt which is done and working. I am hoping a decent x driver comes out within the months but if not a qtEmbedded version of my GUI will come and so we dont have to run X. Watch the rasp pi blog we will be making a post about it soon. I think they like that stuff.
I realize this wouldn’t be nearly as geeky or cool, but you could always just use a Retrode connected to the RasPi for controllers. I don’t think you necessarily have to be using a game cart in it for the controller part to function as well.
Concerning using a traditional SNES controller, you may want to check this out: http://www.ladyada.net/make/usbgamepad/index.html
great to hear you want to try it :)
although the (re-)write of the current state took a lot of time, the commit itself didn’t.
unfortunately I just found out that you need to build typhon with debug enabled (or better say not optimized cflags), else you only see the commandline help. sry for inconvenience. apart from that it should work just fine i hope…
http://www.savagecircuits.com/forums/content.php?309-Mixed-Voltage-Systems-Interfacing-5V-and-3-3V-Devices
I’d probably use a voltage divider at the very least on the data lines.
I’ve used WahCade (http://www.anti-particle.com/wahcade.shtml) for mame in linux. It’s a copy of the popular MameWah, and seems to work well with everything. It does have a struct with the different inputs types used in mame, and it’s missing some of the newer values, but it’s all in python or perl, and easily editable.
Thanks a lot! I also think that using original controllers is an important thing here.
Yes – the controllers are powered with 5V. The GPIO pins are sending 3.3V to Latch and Clock. I tested the same circuit in a previous project with an ATMega328 and found that this is working well (at least so far). I added a link above that points to a chapter of the Uzebox documentation about the NES/SNES controllers.
The resistors are for the optional LEDs and the button and have no function here.
So far, there is no over-voltage protection here. What would be your advice here?
Hi! Thanks for the links – I will test your updated code within the next days and report about it … or maybe someone else is faster than me ;-)
hi! Today I commited a major code rewrite of my linux program/emulator launcher “typhon”.
I don’t have a raspberrypi yet, but I’m sure it will work on it. (requires sfml2 master, tinyxml, opengl and/or some optional stuff for p3t ps3 themes or videos).
To be updated (when 2.0 is ready) homepage with older vids, screenshots and themes:
http://www.frostworx.de/?p=1
google code project page with latest code:
http://code.google.com/p/typhon-launcher/
This is pretty great – I’d been thinking about using a Raspberry Pi as a game console to replace my getting-flaky SNES. Nice touch using the original controllers instead of an adapter!
So, you are powering the SNES controllers with 5v? If so are the GPIO pins sending the controllers a logic high of 3.3v to Latch and clock, or are you just relying on them to pull the pins low? I’m also guessing that the resistors on that board are for interfacing the data pins to GPIO ins or are those for the LEDs you speak of?
Thanks a lot!
Yes, I agree. This could be implemented in a more cleaner and, at the same time, more efficient way! I will take care for this within the next days.
Nice work! However, I may have noticed an issue with your code. Since you use the same clock for both controllers BUT the code isn’t aware of that you can lost some events, specially if you are using NES mouses that send their relative position since last poll. The controllers will count any poll signal, so even if you’re only looking on B the A controller will reset as well.
Keep up the good work!