Tutorial: ControlBlock with RetroPie and SNES or NES Controllers
Introduction
This is a post as part of a tutorial series about getting to start with the ControlBlock with various images for the Raspberry Pi. In this tutorial we will learn how to use the ControlBlock with RetroPie and SNES or NES Controllers.
Preparation
If you have not already done it, we need to download the RetroPie image first. You get the image on the official RetroPie downloads site. When you have downloaded the image you need to load it on your SD card. You can follow the Raspberry Pi Software guide for that, if you are unsure how to do that.
Installing the ControlBlock Hardware
Make sure that the Raspberry Pi is switched off before you do any hardware work on it. Attach the ControlBlockBlock with its female header to the GPIO pins of the Raspberry Pi as shown on the following image:
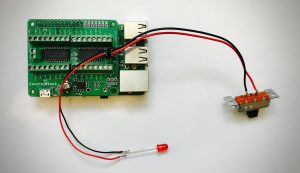
Attach your power switch to the two pins that are marked with “Switch”. Again, the above image shows that exemplarily.
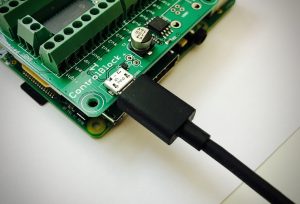
Attach the micro USB connector of your power supply to the micro USB connector of the PowerBlock:
Connecting SNES and NES Controllers
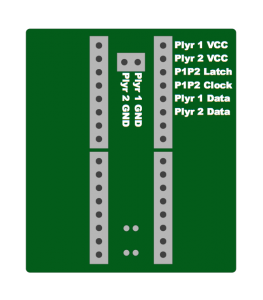
The ControlBlock can also be used to poll NES and SNES controllers. Here is a diagram that describes the pin out for using NES and SNES controllers with the ControlBlock:
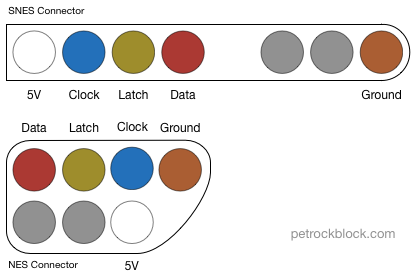
Here is a pin out diagram for NES and SNES connectors:
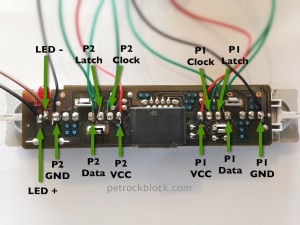
If you want to use a SNES case, here is a diagram that shows the pin out of the original SNES controller front:
You can also connect a latching reset button to Player-1, Input B. If the button is pressed a virtual ESC-key press will be triggered.
In order to poll NES and SNES controllers the configuration in the file /etc/controlblockconfig.cfg must set “gamepadtype” to “snes”:
[code] "gamepadtype" : "snes"[/code]
You can start editing that file, for example, with the command
[code] sudo nano /etc/controlblockconfig.cfg[/code]
After making the needed changes you can save and exit the editor with “Ctrl-X” and “y”.
Installing the ControlBlock Service
We install the ControlBlock driver from the console via SSH. In order to install the ControlBlock driver and service we can follow the quick installation instructions as given on the driver Github site. To install the driver and the service you just need to call this one command:
wget -O - https://raw.githubusercontent.com/petrockblog/ControlBlockService2/master/install.sh | sudo bash
That command will download the installation script of the ControlBlock service and start the script. It will compile and install the driver as well as install and start the service:
When the script is finished, you get a success or failure message in the console. In case of a success, you can also see that the optional status LED stopped to flash and, instead, is permanently switched on.
Configuring RetroPie
After the ControlBlock service is installed, you can start the input configuration within EmulationStation. If everything is wired and set up correctly, EmulationStation will recognise the button presses of the SNES/NES controllers correctly and configure everything with the input assistant accordingly.
Conclusion
As you can see, getting started with the ControlBlock involves very few steps. We hope you enjoy your ControlBlock and wish you good luck with your project!
