Homepage › Forums › RetroPie Project › Everything else related to the RetroPie Project › Anyone using the Pi 2 in a bartop?
Tagged: arcade, bartop, ControlBlock
- This topic has 62 replies, 7 voices, and was last updated 11 years, 1 month ago by
 chillimonster.
-
AuthorPosts
-
04/09/2015 at 22:01 #94338
 g0nz0ukParticipant
Hello,
I’ve always wanted to build a bartop, I have a spare monitor and can seen on ebay that the bartops case can be bought etc, but has anyone used the new Raspberry Pi 2 in a bartop?
My ultimate dream (sad as it sounds) would be to get Operation Wolf working in Mame with some sort of light gun, but doubt this is possible.
Thanks
04/10/2015 at 00:19 #94344khaymanParticipantI’m finishing up the basic build and configuration of mine (pic attached). Almost ready to paint! An online kit would’ve been way easier but I kind of wanted to make it my own.
There are several different light guns available for computers. You could probably look around and see what’s available for purchase and then research those models and see what the linux support is like. It’s probably not going to be easy if it’s even supported at this point. You might try WiiMotes but I don’t know how well those work or are supported.
That being said, these projects are advancing quickly and it won’t be long before you might be able to add on light guns even if you do build one now.
04/10/2015 at 09:10 #94373g0nz0ukParticipantThat looks amazing!! Well done, please post when completely finished it would be great to see.
I’ve seen a few flat pack builds on ebay I’m interested in. I want the marquee across the top to be lit up and the buttons too, have no idea yet onhow to do this, but a nice hobby.
I think the Raspberry pi 2 would work well, for mame, megadrive, snes. I see you have a player 1 and 2 buttons how does that work?
Any good bartop forums?
04/10/2015 at 11:20 #94377dpicc68Participant[IMG]http://images.tapatalk-cdn.com/15/04/10/bc466880f371deb1c3ff1fc18e4c2276.jpg[/IMG]
Pi2 is pretty good…
Dpicc….
04/10/2015 at 13:17 #94380g0nz0ukParticipantwow! amazing.
Can I ask what the red buttons are for and the black on on the front?
Is wireing the buttons and joystick easy?
Where did you get the bartop case from?04/10/2015 at 16:45 #94386chillimonsterParticipantHeres a couple of mine……………
04/10/2015 at 17:19 #94391g0nz0ukParticipantThey look brilliant! Well done, lots of hard work there.
Did you buy it flat pack if so where? Love the chrome t-molding.
04/10/2015 at 17:29 #94394chillimonsterParticipantThanks :-)
Nope, both hand built by me.
Got the wood cut to the right witdh at B&Q then set to it with the jigsaw and router.
Currently building two more for people that have seen these and want one – another space invader one (with illuminated buttons and joysticks) and a simpsons themed one
04/10/2015 at 17:36 #94397g0nz0ukParticipantClever.
Where do you get the parts from? Buttons, joystick, speakers, lighting etc.
04/10/2015 at 18:18 #94398khaymanParticipantThere are tons of stores online. If you’re in the US go to FocusAttack. If you’re in the UK Ultracabs is pretty good. I’ve got some stuff shipped to me from Arcade World UK that should arrive in a week or so. It seems like the Europeans have way more options than we do in the states!
First, read and plan a lot out before you buy anything.
So here’s what I’m doing (and your mileage may vary). The joystick and top buttons are suzo-happ competition. The front buttons (in the pic) were originally suzo-happ but I had to order different ones because of a sizing issue (that’s what’s shipping from Arcade World UK). You’ll need a control board to interface the controls to the RPi, most people love the i-pac 2. For speakers I bought the cheapest car stereo speakers and cheapest little amp I could find on amazon but a lot of people repurpose old computer speakers. Lighting is really any strip-based lighting. Mount a power-strip inside your box, plug everything into that and wire it to a single power button you mount on the back. Marquee can be ordered online. Paint. T-moulding. Plexi. Later I’m going to add in a few more buttons to do things like save state/load state within the emulators.
I’m still working out the circuit to shutdown the pi gracefully (as I’ve heard questionable reviews about the mausberry ones). The plan is to have a capacitor which stores enough juice to run it for a few minutes, then when power is cut it sends a command to the pi to shut it down. I’m fairly certain I can figure it out and there are more than a few guides online.
Just do your research, build it, and then show it off in the other forum for people’s projects. You can also get a lot of good support there.
04/10/2015 at 19:21 #94400g0nz0ukParticipantManks thanks, that is really useful.
Don’t suppose you have a picture of your powerstrip wired to a single power button mounted on the outside?
04/10/2015 at 20:08 #94403khaymanParticipantI haven’t gotten that far yet. Right now everything is on my workbench in my garage while I continue to tinker with the electronics, but there’s something similar here:
http://www.instructables.com/id/2-Player-Bartop-Arcade-Machine-Powered-by-Pi/?ALLSTEPSI’m sure if you do some reading around online you can wire it up.
04/10/2015 at 20:30 #94407phrazelleParticipantI’m on the tail end of mine. Functional, but working out some software issues as well as adding a few other hardware elements like the main power switch you just mentioned and a dimmer on the marquee LED strip. Right now it’s running 3 wall warts to a power strip, but I’m flipping over to an ATX PSU before I’m done. Planning on writing a full instructables around it and will post when the dust settles.
All the buttons are LED and stay on constantly. The abundance of buttons allows for full N64 support, but I (as most others )haven’t got the N64 to run smoothly yet. The front triangle buttons are for exiting an emulator – more for show than anything.
[URL=http://s1261.photobucket.com/user/phrazelle1/media/cabinet/IMG_2771.jpg.html][IMG]http://i1261.photobucket.com/albums/ii584/phrazelle1/cabinet/IMG_2771.jpg[/IMG][/URL]
04/10/2015 at 21:09 #94413chillimonsterParticipantI tend to use ArcadeWorldUK for my parts – next day delivery and usually has everything in stock (Had issues with Ultracabs and stock)
Speakers – i tend to use Dell Soundbars – strip them down and use them that way – the AS500 is the best (and easiest to strip)
Also built this one based on Tron (Illuminated Blue Buttons)
04/10/2015 at 21:22 #94416chillimonsterParticipantSpeaker Panel
Quite a neat solution for the speakers using the soundbar and cannibalizing it.
And by using Insert Nuts (£4 for a bag of 50 from Screwfix) there are no external screws anywhere on the cab.
04/10/2015 at 22:15 #94434khaymanParticipantphrazelle and chillimonster, those are some awesome builds. Really great job.
04/10/2015 at 22:34 #94440g0nz0ukParticipantThat TRON one is amazing!!! illuminated buttons are a must.
Any tricks to get that chome T Moulding working roudn the curved areas, heard this is hard to do?
Do you use the ipac-2 or arcade usb controller for your buttons? I see you can buy various kits, not sure what woudl work with the pi 2.
I guess any old 19inch monitor should do the trick too?
I can’t find a marqueee light, but I can worry about this much later.
Very pro jobs, you she set up a shop. Seen many on ebay, some are very expensive.
04/10/2015 at 23:29 #94444chillimonsterParticipant[quote=94434]phrazelle and chillimonster, those are some awesome builds. Really great job.[/quote]
Thanks.
:-)
04/10/2015 at 23:40 #94445chillimonsterParticipantThanks.
The trick with the t-moulding is to make sure it’s warm. It’s like a coiled spring if cold.
When getting it around the corners I trim the barbs off for the inch or so where it goes around the corner. The slit is tight enough so it will not move. Tried all sorts of different ways and that is the best.
For lighting the marquee I use led strips (search eBay for 3528 led strip). It’s quite cheap and easily wired into a 12v psu.
Controller / encoder wise I use either the xin-mo or the zero delay encoders. If using the xin-mo I use two separate controllers , one for each player. Saves hassle in the retroarch emulators as the two player unit does not play nice with two player console games. Both work well with the pi2. The ZD are available from eBay at around £8 each from China including post and only take 4 days to arrive.
The beauty of those two is that they both perform pretty much the same and can share the same config files
I use any 19″ lcd. Decase it and rebate it into the monitor panel.
I’ve got hundreds of pictures documenting the build process so any questions fire away and I’ll do my best to help.
If you need details of the local company that does my printing let me know and I’ll put you in touch. He’s quick and the price is very reasonable. I pay £32 for two side arts and a marquee.
[quote=94440]That TRON one is amazing!!! illuminated buttons are a must.
Any tricks to get that chome T Moulding working roudn the curved areas, heard this is hard to do?
Do you use the ipac-2 or arcade usb controller for your buttons? I see you can buy various kits, not sure what woudl work with the pi 2.
I guess any old 19inch monitor should do the trick too?
I can’t find a marqueee light, but I can worry about this much later.
Very pro jobs, you she set up a shop. Seen many on ebay, some are very expensive.
[/quote]04/11/2015 at 00:21 #94451phrazelleParticipant[quote=94444]
<div class=”d4p-bbt-quote-title”>khayman wrote:</div>
phrazelle and chillimonster, those are some awesome builds. Really great job.Thanks.

[/quote]Yes, thank you! This has been a fun project and I already want to make another one after all I learned throughout this build.
For reference, I got my controller kits off of eBay from China here. They work well, but we will see about longevity. The USB interface was recognized by my Pi 2 without issue; plug-and-play.
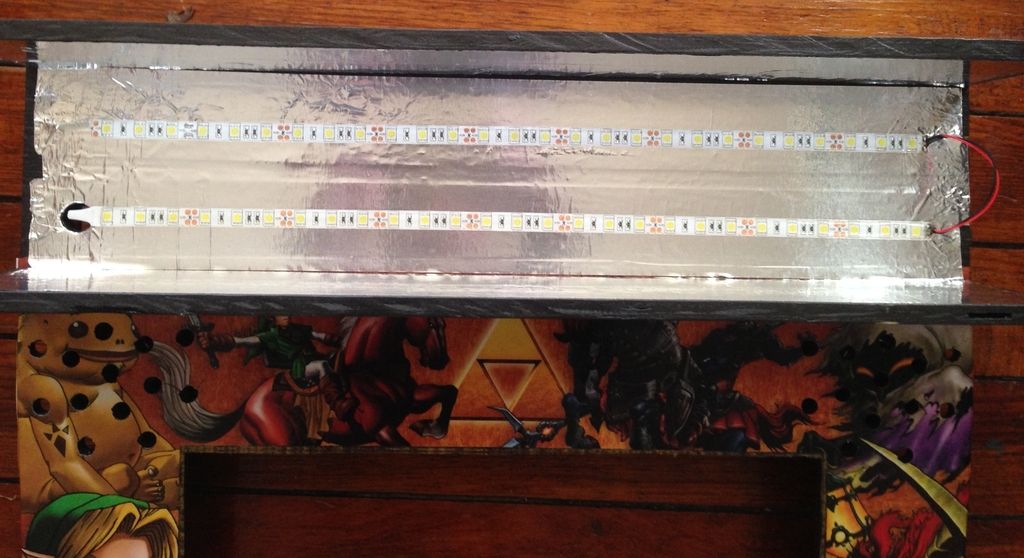
I also used LED strips for my marquee lighting. These were super cheap, as good of quality as at MicroCenter (they look like the same ones but in different packaging,) and fit the application perfectly. They are pretty bright though, and I am adding a dimmer in to adjust to a sweet spot. Maybe the aluminum tape I put in wasn’t totally necessary and could be causing the issue, but it definitely guarantees no spot-lighting from the strips.
I had my marquee graphic reverse-printed on the piece of acrylic I cut for it at my local print shop. *side note* I cut a piece of acrylic to sit on top of the vinyl control board graphic, but the pressure of the buttons screwed down made visible bubble-esque areas under the acrylic around the buttons and the LED illumination accentuated it to the point of it looking tacky. I ended up removing the acrylic altogether. I would have the graphic reverse printed on that acrylic piece if I were to do it again.
As for my display, I bought a 17″ Dell monitor off of eBay for $10 and ran an HDMI > DVI cable to it. I decased it like chilimonster did as well.
I used a set of 3.5″ Kicker car speakers and an amp from Adafruit for my audio. Had to disable audio dithering on the Pi to fix an audio glitch, but it sounds great.
04/11/2015 at 00:22 #94452khaymanParticipantSaves hassle in the retroarch emulators as the two player unit does not play nice with two player console games.
This is a pain. There are unofficial workarounds that involve getting the source and modifying it to support two controllers but that’s obviously not ideal. I ordered and ipac 2 and am going to use the xin-mo for my little portable single player build that I’m doing next.
04/11/2015 at 00:38 #94456g0nz0ukParticipantThanks for the tips! I’m many weeks away to getting anywhere near any of this so I will post back if that is ok.
My Pi 2 comes tomorrow so I will play with that for a while with my old 19inch monitor, IT is my job, building arcades isn’t :)
Sorry for the dumb question, but what do you mean by trim the barbs off and inch?
Got any screenshots on how the led strip is wired into a PSU? I guess I will have an extension lead in the back with the monitor and pi 2 attached.
Where does the joystick and illuminated buttons get their power from?
Damn I’m excited. This is what I may get http://www.ebay.co.uk/itm/BARTOP-ARCADE-MACHINE-2-PLAYER-DIY-FLAT-PACK-KIT-18MM-MDF-WITH-T-MOLD-SLOTS-/161640792425?pt=LH_DefaultDomain_3&hash=item25a28ac169
04/11/2015 at 00:39 #94457g0nz0ukParticipant2 player games will be a must so you think the ipac-2 with the pi 2 is best?
04/11/2015 at 00:49 #94458robofruitParticipantSome amazing builds. What I would say is have a budget and design what you want before starting. Don’t just base it on having a spare monitor. For example mine had to be portable as I run a game group.
04/11/2015 at 00:49 #94459g0nz0ukParticipantThanks for that detailed reply, did the joysticks that Arcade USB kit have on ebay make any annoying “click” sounds when push arround, I noticed on some youtube videos their joysticks clicked in every direction when playing games. So these uses one congtroller for both players? Why do some use the ipac2 and others the usb method?
I like your link, saw these too.
What did you use to cover the monitor, plastic or glass?
How did you power the led strips and install a dimmer, very smart idea!
04/11/2015 at 00:55 #94460g0nz0ukParticipantYeah good point, I have a small budget and it won’t leave the house.
I need to have patience too (excited) as I want it all now, but rushing is when things go wrong.
04/11/2015 at 01:14 #94462dpicc68Participant[IMG]http://images.tapatalk-cdn.com/15/04/10/f715392ddab086ec458dd7b9103cce2a.jpg[/IMG]
[IMG]http://images.tapatalk-cdn.com/15/04/10/692c868306dcdf1fe3fc9490c552ded4.jpg[/IMG]
[IMG]http://images.tapatalk-cdn.com/15/04/10/f07fe11530543fa0cc57f2afe3f3bd50.jpg[/IMG]
I used usb for joystick .. See wiring…
19″ lcd
Speakers and amp with volume pot.
For power … Used a powerboard .. Then an ATX RASPI power supply wired up to a led button on the back.Didn’t go with Graphics or T moulding because it sits in our dining room… My wife would not be happy with something that looked too loud…
Good luck
Dpicc….
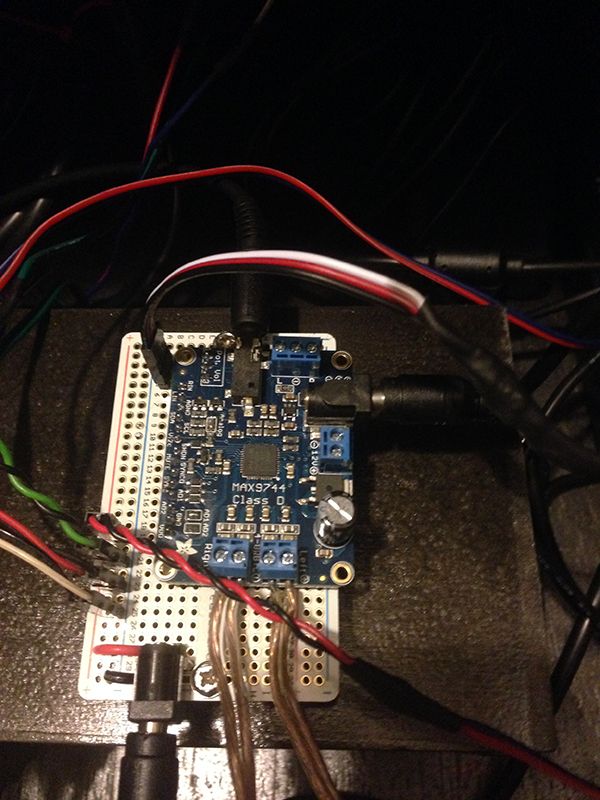
04/11/2015 at 01:33 #94463phrazelleParticipant[quote=94456]Got any screenshots on how the led strip is wired into a PSU? I guess I will have an extension lead in the back with the monitor and pi 2 attached.[/quote]
Here is my current setup, but this is changing to add in the main power switch and when I get my ATX PSU in-hand. I attached the amp to the same protoboard that is running the power rail for the LEDs (on the left of the board) so I could have them all powered by the same PSU. I will run the power lines from the amp to the same power rail and have that tapped into the ATX.
That power rail is 12v, so it is powering the LED strips and the triangle buttons on the front of the machine (they are 12v also.)
[quote=94456]Where does the joystick and illuminated buttons get their power from?[/quote]
On the ones I ordered from eBay, the LEDs in the buttons are 5v and pull power through the USB connection to the Pi.
[quote=94459]did the joysticks that Arcade USB kit have on ebay make any annoying “click” sounds when push arround[/quote]
No clicking on the LED buttons, but the 1 & 2 player and triangle buttons, as well as the joysticks all use the push button micro switches, so you get the “click.”
[quote=94456]So these uses one congtroller for both players?[/quote]
These have individual boards for each player with an independent USB cable for each.
[quote=94459]Why do some use the ipac2 and others the usb method?[/quote]
From what I understand, the ipac system emulates a keyboard (best suited for PC builds) for usage when you can only (or easily) assign button configurations to keyboard layouts instead of USB controllers. The Pi has no issue identifying most USB controllers – or at least with a little tweaking.
[quote=94459]What did you use to cover the monitor, plastic or glass?[/quote]
I used acrylic (plexiglass)
[quote=94459]How did you power the led strips and install a dimmer, very smart idea![/quote]
The power layout is above, and the dimmer will be a 10k potentiometer with a 1-450ohm resistor (haven’t tested yet) in line to keep the LEDs from blowing out.
04/11/2015 at 01:51 #94464phrazelleParticipantdpicc68 – That looks really clean. Nice work!
04/11/2015 at 10:05 #94508g0nz0ukParticipantThanks for the info. I think I’m confused with this protoboard. I will have an extension lead in the back to power the pi and monitor, as you say the controls can be all power by the pi. I guess the speakers can be plugged into an extension lead? So it just leaves powering the led strip.
I’m not using a pc mobo or psu (I hope) as they are too noisy.
04/11/2015 at 21:53 #94595chillimonsterParticipant[quote=94456]
Sorry for the dumb question, but what do you mean by trim the barbs off
[/quote]After this reply I decided to do a little YouTube video to explain as I get asked about it quite often
Hope this helps to clarify. The chrome is no different than the standard stuff.
I usually use a rubber mallet but didn’t have one to hand and as it was standard red moulding a stand hammer was ok. On the chrome is definitely use a rubber mallet.
04/11/2015 at 22:30 #94606petrockblogKeymasterJust in case you have not seen it already: The ControlBlock (https://www.petrockblock.com/2014/12/29/controlblock-power-switch-and-io-for-the-raspberry-pi/) was also designed as combined controller and power interface for bartop arcade systems. There are videos at the end of the post about the ControlBlock – they show the usage with arcade controllers as well as the power switch functionality:
04/12/2015 at 22:29 #94688g0nz0ukParticipantThought I’d replied to this.
Many thanks for the video Chillimonster, what a legend.
I’ve send you a private message too.
ALso is it me or is the sound quality quite back on the pi? Lots of background noise.
04/12/2015 at 22:32 #94690chillimonsterParticipantYeah. Got your message and will reply tomorrow with details.
No problem with the video. Hope it helps.
For the audio you can edit the config file and add the line
disable_audio_dither=1
This sorts most of the background noise.
04/13/2015 at 16:42 #94731g0nz0ukParticipantHi Chillimonster,
Where is this config file I can edit please for disable_audio_dither=1?
Thanks
-
AuthorPosts
- The forum ‘Everything else related to the RetroPie Project’ is closed to new topics and replies.