Homepage › Forums › RetroPie Project › Peoples Projects › My Playstation Mod
Tagged: pi, PiStation, playstation, psx, Raspberry
- This topic has 19 replies, 11 voices, and was last updated 11 years ago by
 EkDor.
-
AuthorPosts
-
03/29/2013 at 19:28 #1475
 Jonathan DemarksParticipant
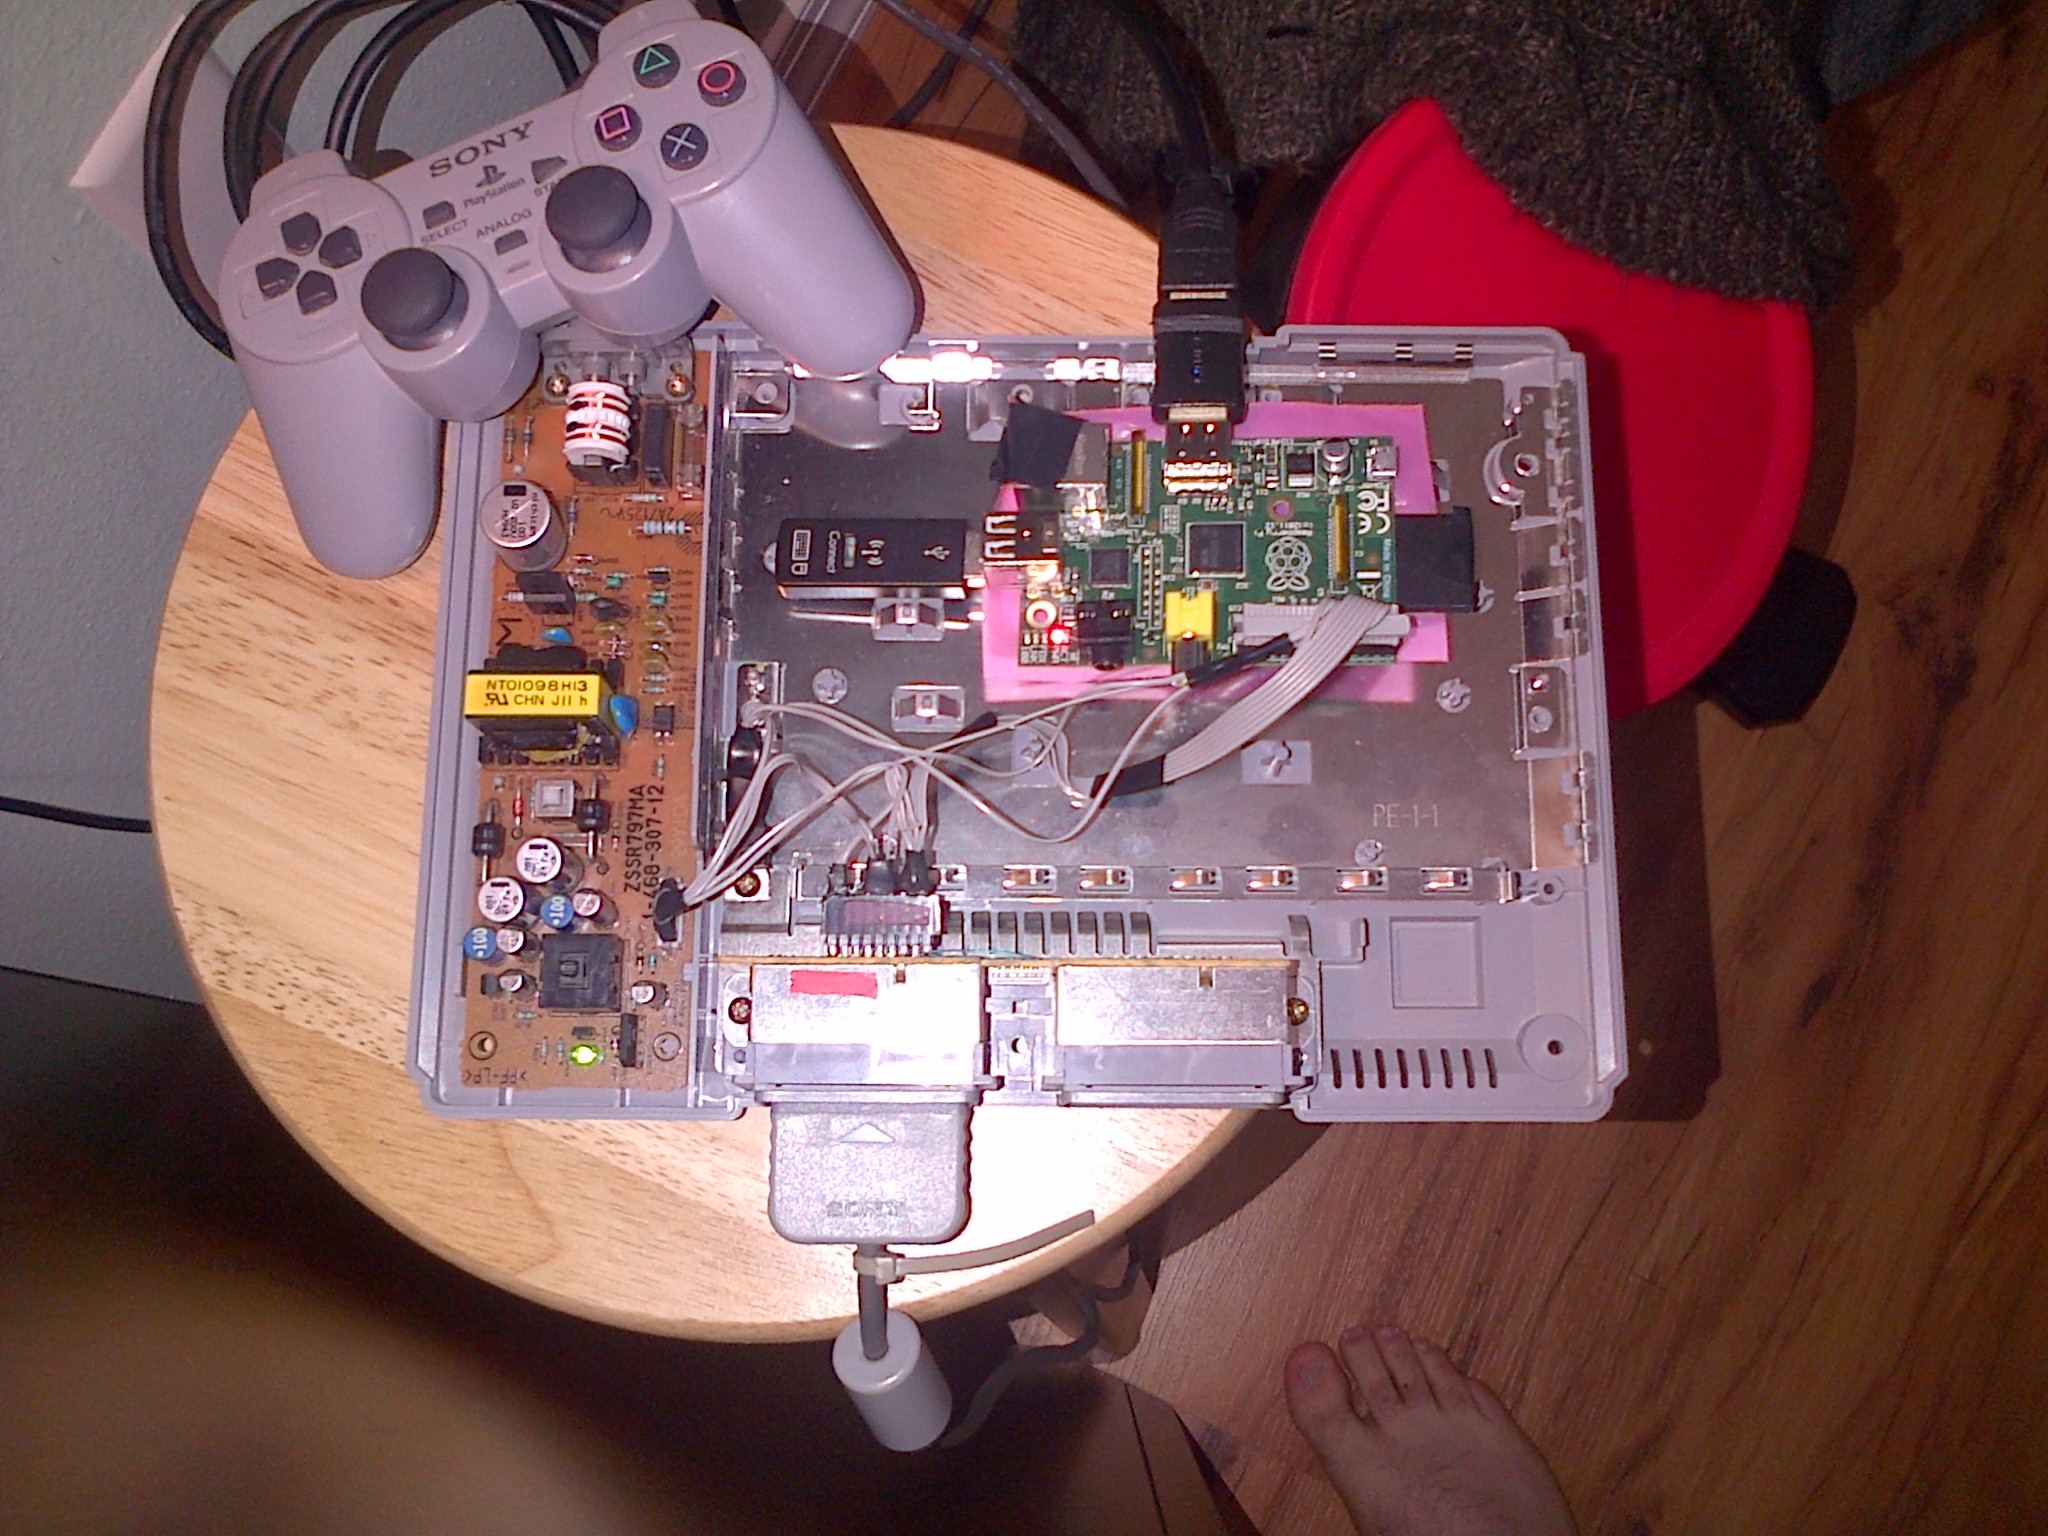
Hey, I just wanted to post and say thanks to the PetRockBlog and community as well as show off the mod I was able to make:

Raspberry Pi (Rev 2 512MB) – Element 14 ($35)
PlayStation 1 (SCPH-9001) + 2 Controllers – Ebay ($15)
HP Wireless Keyboard – Junk drawer ($0)
SD Card – Junk drawer ($0)
HDMI Extender-y thing – Came with a pack of stuff from AmazonFeatures:
Both PSX Controllers work!
Re-used PSX power supply!
Reset button wired to GPIO for emulator exit
Ben Heck approved build! Can easily be opened and returned to working PSX status.A couple things that made my life easier is to use the built-in PSX power supply. It powers the controllers (including rumble) and I ran the 7.6v pin through a 7805 to make it 5v. This was really easy and you can spot the 7805 wired into the harness as it doesn’t require any extra components. Also I was able to re-use the serial port hole with only slight cutting to the HDMI adapter made it really snug and prevents mechanical damage to the Pi.
If you want to do this just beware of a couple things:
The PSX controllers were not meant to be used with the PSX controller plug, so you need to cut a trace and make a jumper for later when you want to restore the PSX to being a PSX. (Recover your Pi.)
The PSX power supply doesn’t really deliver that much current so it gets a bit unstable. Could also have to do with my linear regulator.
Speaking of the linear regulator, it gets hot, so you can see I tacked it down to the RF shielding and screw to act as a heat sink.04/01/2013 at 09:00 #1480skater_j10ParticipantNice work Jonathan! I like the re-use of the power supply, great idea!
04/30/2013 at 13:11 #1654karlossParticipantHi, really nice build/idea, I am currently working on my own little project, will share when done. could you please link me to the process of resetting the games via the GPIO pins please?
Thanks
Karl
04/30/2013 at 14:16 #1655Jonathan DemarksParticipant[quote=1654]Hi, really nice build/idea, I am currently working on my own little project, will share when done. could you please link me to the process of resetting the games via the GPIO pins please?
Thanks
Karl
[/quote]I’m using the SNESDev-Rpi (also PetRockBlog) to handle that. The link is here and it describes how to download build and install it as a service so you no longer need a keyboard: https://github.com/petrockblog/SNESDev-RPi.
-
Here are a few extras though to use it with the PS button:
- Move line 331 in src/main.c (initializePads( &pads );) to under line 340 (if (pollPads) {) to squash a bug.
- Add these two lines under line 333 (if (pollButton) {)
- bcm2835_gpio_fsel(buttonPin, BCM2835_GPIO_FSEL_INPT);
- bcm2835_gpio_set_pud(buttonPin, BCM2835_GPIO_PUD_UP);
- Make sure the SNESDev-Rpi is set to start up in mode 2 (poll button only).
I have attached my main.c for reference, but it does a couple other things (changes esc to one button press and shutdown to 3).
05/01/2013 at 10:37 #1660karlossParticipantHey,
Thanks for the quick reply.
I am using the SD-Image, 1.4.1 (are the problems using this over compiling from scratch?) and i see it has SNESDev-Rpi built in..
Is it possible for me to just use a Momentary switch on gpio and use that the quit? or does it need to recieve a keyboard command of some sort?
Thanks
Karl
05/02/2013 at 14:39 #1673flatteryParticipantI love it. Is the Raspberry just stuck down?
I already made a RetroPie from and old NES and half way through I discovered that it had been done 1000 times.
So many projects… so little money
I love the bare foot too…
05/02/2013 at 14:56 #1674Jonathan DemarksParticipantI cut a notch in the HDMI extender so that it’s held in by a friction lock when the case is closed. It’s actually a really solid connection and easily withstood my 5 year old son tripping over the controller wires and bringing the unit crashing down. The Pi popped out of the HDMI extender and I just needed to plug it back in. The extender is worth the $2 it would cost on Amazon.
05/03/2013 at 12:51 #1679karlossParticipantHi Jonathan,
I guess my question is beyond your knowledge or not possilbe?
Thanks
Karl
05/03/2013 at 22:11 #1685jbaker1225ParticipantI believe most people use a momentary switch to the GPIO to do what you’re asking.
05/03/2013 at 22:38 #1687Jonathan DemarksParticipantSorry Karl, I’ve been busy with work lately. The Playstation has a momentary switch (like jbaker1225 mentioned) and my code changes to the main.c file are just there to make it compatible with that switch (which drives the pin to ground) so it needed to have the pull up resistor activated. I maintained the GPIO pin 17 (1-11) as there was no reason to change it in my mind.
Additionally there’s a bug which initializes the GPIO pins to the SNES configuration and I needed them to be setup for PSX controllers, so I moved that code further down.
05/30/2013 at 00:12 #1902AnonymousInactivePlease Help!!!
I am trying to do a similar thing but i’m having issues getting a psx (original, no analog sticks or dual shock) controller to work. I have the psx controller connected to my 512mb rpi as follows:
PSX RPI GPIO
Pin 1 > Pin 3
Pin 2 > Pin 8
Pin 4 > Pin 6
Pin 5 > Pin 1
Pin 6 > Pin 10
Pin 7 > Pin 12I have installed the RetroPie SD image ver. 1.5. Expanded filesystem using raspi-config and ran the following commands:
sudo su
apt-get update && apt-get upgrade
sudo apt-get install -y git dialog
cd
git clone git://github.com/petrockblog/RetroPie-Setup.git
cd RetroPie-Setup
chmod +x retropie_setup.sh
./retropie_setup.shFrom the RetroPie setup I did:
#3 Setup
#9 Install/update multi-console gamepad drivers for GPIOThen from another terminal using SSH:
zless /usr/share/doc/gamecon_gpio_rpi/README.gz (instructions)
modprobe gamecon_gpio_rpi map=0,0,0,0,7,0
tail /var/log/kern.log (screenshot “psx verify.png”)
apt-get install joystick
jstest /dev/input/js0 (screenshot “jstest js0.png”)After a reboot, RetroPie starts with the splash saying no “Press a button on the device for player 1, No joysticks detected, press f4 to quit” and pressing a button does nothing. I have take a multimeter to pins 4 & 5 on the psx and am getting 3.3v so i know the voltage is ok. Is there a step I’m missing? I found my sources on a few different sites considering I was unable to find a good tutorial that gave all the steps needed.
Any help would be appreciated!!!!
05/30/2013 at 00:15 #1905Jonathan DemarksParticipantI did a clone for a friend of mine. He had the original Playstation controllers and I was not able to get them to work. Plugged in my DualShock controllers and it worked immediately. DualShock and DualShock 2 work, but the original controllers don’t seem to. Not sure why and since I don’t have any I haven’t investigated it.
05/30/2013 at 05:47 #1907AnonymousInactivecool, I guess I’ll pick up a dual shock and see if it works. I appreciate the quick response.
06/02/2013 at 20:55 #1958AnonymousInactivewell that was the issue. I’ve got a dualshock working but I’m still having a few issue.
#1 can’t get the controller to work to select emulators.
#2 Every time I reboot I hand to redo modprobe
any suggestions?
06/03/2013 at 03:19 #1960Jonathan DemarksParticipantOn my ipad right now, so I may not be of super great help…
There’s a guide on the pet rock blog that explains how to permanently have a kernel module loaded (add a line to a file).
There’s also a file in your home directory to delete and emulationstation will ask you to remap the controls (it’s on the forum here as well).
I wish you success!
11/29/2013 at 15:49 #3358zoomy500Participanthow did you connect the psx controller to the pi, as in which wire to where? could u show a picture?
04/22/2014 at 13:18 #6229komeradParticipantNice job you done there. I definatly want to try this at home :)
Do you have more info on the wiring (soldering, as you done on the back of the controllers). I’m no electrician.Tia
06/14/2014 at 02:54 #7525MartinGuestI would also like to know more about the wiring up of the controllers and psu to the gpio. Is there a guide somewhere? thanks.
05/30/2015 at 17:13 #98713AnonymousInactiveHi folks,
I just want to let you know that I also created a PiStation.
I have a description of my work on my homepage, unfortunately it’s only in german: http://www.niconico.de/projekte/projekt_pistation.htmNico
06/11/2015 at 14:11 #99487EkDorParticipantCool. Just started Something like this myself. Posting idea and current progress soon. thanks for this.
-
AuthorPosts

- The forum ‘Peoples Projects’ is closed to new topics and replies.